Showing posts with label wood veneer. Show all posts

Wednesday, July 10, 2013

Hello Vanity...and a kids room desk alternative.

Well, progress on the master bathroom continues.  It still feels like there is still a ton to be done, but the rest of it should go by quickly.

The vanity and sink

and floor to ceiling tile backsplash
have been installed...

which means that all that's left is installing the tub, toilet, fixtures and lights.  I am kinda in disbelief that I will have my very own bathroom in a matter of days.  
I will continue to post pictures of the progress, but might hold off on posting any more full room reveals...you know, so that I can build up all sorts of excitement in anticipation of the big daddy reveal.  

In other news, I've been redoing my middle daughter, Avery's, bedroom.  Some of you may recall that she recently moved to the basement.   
After a few months of "isolation" she decided she wanted to move back upstairs.  It's starting to feel like a never ending game of Musical Beds up in here.  Anyway, Studs and I finally layed down the law and told her she is not allowed to change rooms until she's packing up for college.  Technically, we just bought ourselves eight years of time.  Realistically, I give ourselves eight weeks.  Whatevs!

One of the projects I just completed for her bedroom was a "floating desk".  This is a really great option for a room with limited space.  Avery's room is only 10ft x 11ft, so there just simply wasn't room for a bed, a dresser and a desk.

I was inspired by this beautiful floating desk I found online.  I love everything about.  It just looks so...minimal.
{allmodern.com-$659.00}

I started with this prefab wall shelf from Ikea

{Ekby Alex-$46.99}

Here's where the fun part comes in.  
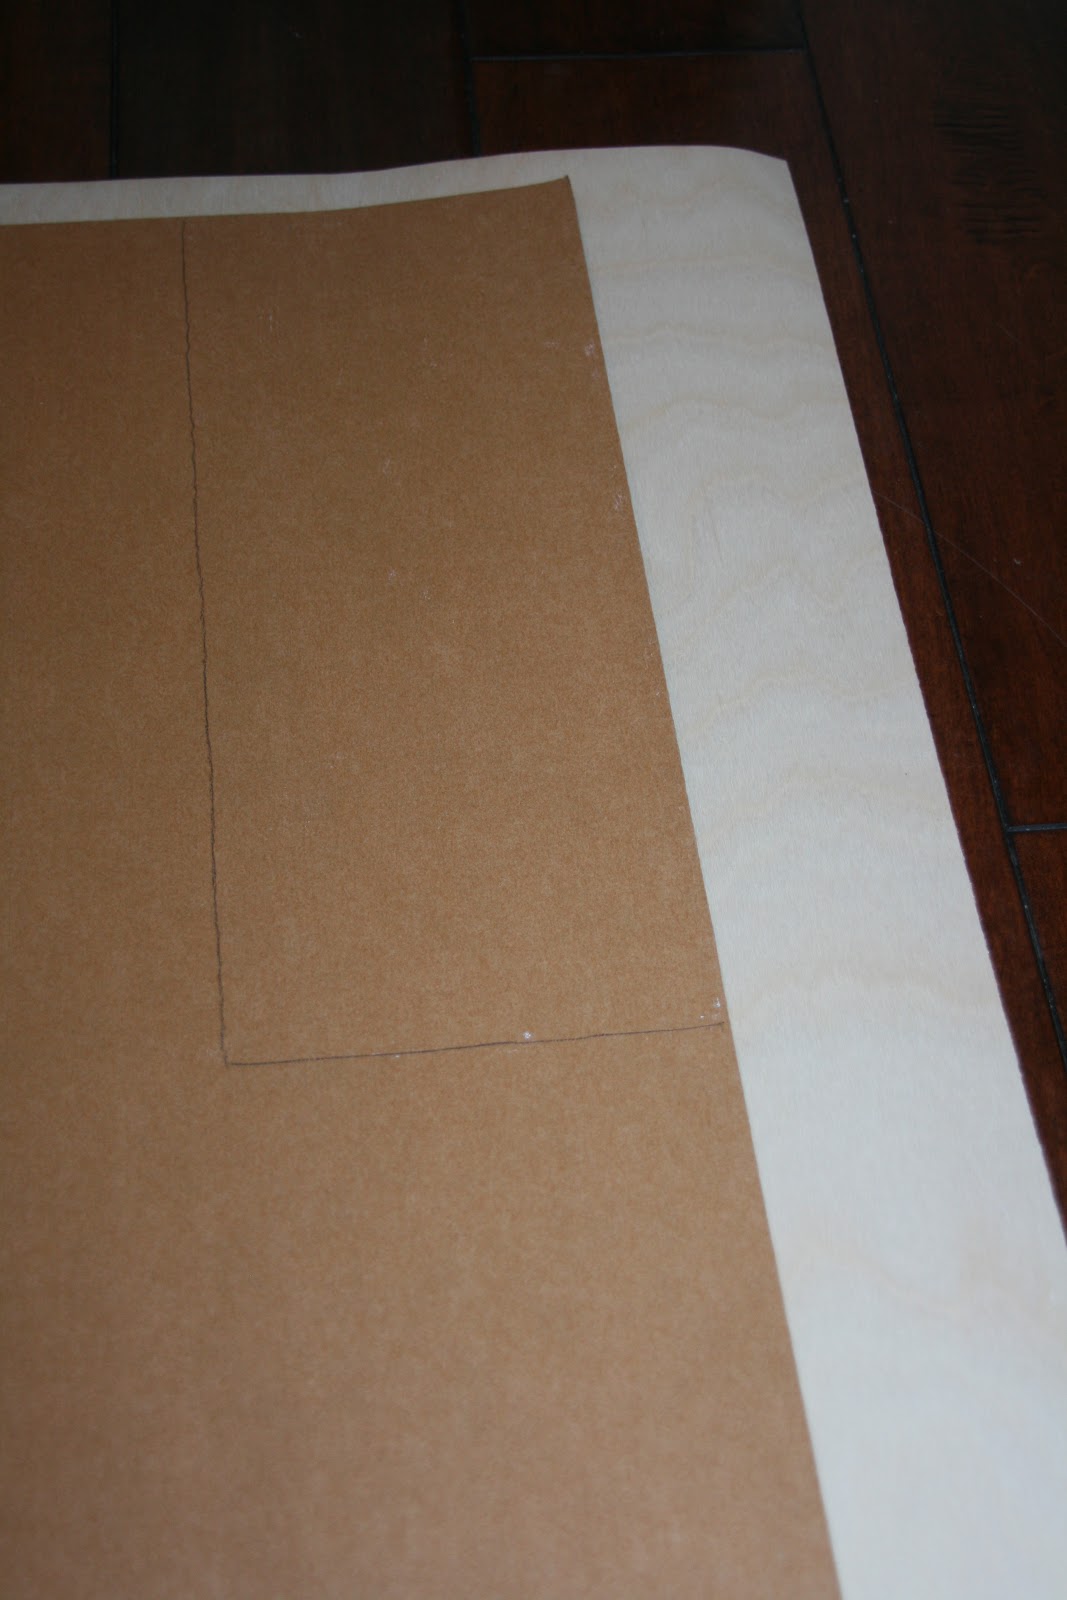
This shelf is just begging for some personalization...so, I decided to utilize some of my left over veneer.

I've mentioned how easy wood veneer is to work with.  It is fast becoming one of my favorite DIY tools.  Everything just looks better with some wood veneer, no?

Before I assembled the shelf {ya know, cause it is from Ikea, which is basically Lego for adults} I found the two drawer fronts and traced around them on the veneer.  Then, I cut the pieces out and glued them onto the drawer fronts using this:
  
I left them to dry while I finished assembling my big lego.  And that was that.  So easy! 
I was ready to mount the shelve/desk to the wall.

I purchased two of these natural wood brackets at $4.00 each at Ikea for attaching the piece to the wall.
Studly made sure that both of the brackets were screwed securely into studs.  This step is critical.  The shelf itself is fairly hefty, then combined with the weight of someone leaning on it to do homework and a few pictures and a lamp, well...
I highy recommend that both brackets be mounted onto studs.  Otherwise your floating shelf may suddenly become a sinking shelf.  

Here's the end result.


It takes up hardly any space and looks flippin' sweet!
Not too shabby for $50.


Wednesday, June 19, 2013

kids room revamp...using crap from the garage edition.

I know I've been saying this for months, but progress on the bathroom is underway.  No, seriously.  The electrician came out Monday and rerouted some outlets and prepped the ceiling for my pendants and chandy.  And as I sit here typing, I can hear the plumber making all sorts of noise with a saw.  Later today the drywaller is coming to seal up the ceiling...the attic space above the shower has been exposed for the last three months and has permeated my bedroom with an unpleasant, musty smell.  AND then, later later, the contractor will hopefully be by to put the subfloor back down so that I don't have to worry about any of the kids falling through the drywall into the basement.  Folks...we may have a functional bathroom within a few weeks.  Hallelujah!!!

 This happy news is a great segway into the title of this post...kids room revamp {using crap from my garage}.  With my budget pretty much zero {due to all things bathroom}, I was forced to to revamp the kiddos bedroom using stuff I already had in my possession.

So, I decided to scavenge the garage and house to see what items I could reuse.

I had a ton of leftover wood veneer from my dresser project.  It is absolutely beautiful and I hated that it was sitting in storage collecting dust.  I decided to create some hexagon "tile" with it...since the honeycomb motif is all the rage right now.

It was a super easy project {I simply cut the hexagons out of the veneer with scissors}that has a lot of visual impact. 
I painted some, but also left some natural wood because I love the color and grain of it.


I also used some of the left over veneer to make some customized artwork.
An embroidered, ombre "R" for Rowan

and a super cool image of master Yoda for my Star Wars fanatic, Beckham.
Who knew you could print on wood veneer?  It took a little coaxing and multiple attempts, but I finally got it to work.  {because the veneer is significantly thicker than paper, you have to manually help it through the printer so that it doesn't get stuck}.

The kiddos needed some shelving for housing a few personal items, so I decided to make some "half hexagon" shelves out of a plank of wood I had bought awhile ago for some reason that I can't remember now. 


I used one 4x8 plank of wood which runs about $6 at the home improvement store, and was able to make four shelves out of it.  I think they turned out pretty good considering they were only $1.50 a piece to make.

I made the kiddos new pendant lights for above their beds using some wicker, food cover dealies I found for $7.  This project was so easy and cheap.  Don't you just love customized lighting?!


I revamped the nightstand {for the third time}
{green phase}

{blue phase}
using some spray chalkboard paint I had on hand.  I actually like how resistant chalkboard paint is and how easy it is to clean.  And since the kiddos have a knack for doodling all over furniture, I figure I'm one step ahead of them now.
{black phase}


The white blinds have been bugging me for a long time.  I'm over plain white blinds.  I love matchstick/bamboo blinds, but they are super pricy and purchasing some was not in the budget.  So, I grabbed my can of chalkboard paint and went to town.
I think the "not new, but greatly improved" black blinds are much cooler than the white...at least aesthetically speaking .  I'm always amazed by what a can of paint can do....and better still, the revamp only cost me $10 {I ran out of paint and had to buy two more cans}.

I don't know about you, but my kids aren't always the most accomodating when it comes to bedtime.  I decided to try out some "mommy mind tricks"  to see if it might aid in the bedtime ritual.  I made this simple/inexpensive hopscotch mat out of cork board squares.

Cork tiles are readily available at Walmart and Target and cost around $5/ four squares.  I stensiled the numbers on using regular, old craft paint and attached the squares together using duck tape.
The hope is that when it comes to bedtime now, the little ones will be excited to hopscotch their way right into bed.  I don't know how long the novelty will last, but here's to hoping.

The last space to be addressed is this little reading/play area.  Every kids room needs a kid sized rocker and faux sheep sking rug, no?  I found the rocker a while back at the thrift store for $5 and I stole the rug out of my bedroom.  I think some wall storage for books and toys etc. might be in order since the room is majorly lacking in storage, but I'm still in the blue print stages of the design. Stay tuned for the dramatic conclusion!!!
For now the space serves as a little reading nook/baby doll rocking area.

Aside from the laminate and carpet, this little revamp only cost me around $50.


Monday, April 8, 2013

Spring cleaning and some other stuff

Did a little spring cleaning over the weekend, starting with my blog.  How do you like it?  It feels so much brighter and cleaner now.  If only it were so easy to do the same in my house.

Also, Beckie over at knock-off decor featured my wood veneer dresser redo, inspired by West Elm's patchwork dresser.

I mentioned in the origional post how surprised I was at how easy the veneer was to work with.  
I can't say if that is true for all veneers, but it was about the three types I used.

Anywho, this reminded me that I have still a bum load of wood veneer starting to collect dust.  I should start thinking of some projects I could do that would use some of it up.  Have you come across or made any cool projects involving wood veneer?


Saturday, March 2, 2013

West Elm Dresser Knock-Off

The last few weeks have been a little hectic.  My daughter had a piano recital a few days ago, and also just competed in a piano competition last night.  She did such an awsome job.  I just had to share how proud I was off her.  She is turning into quite a poised little lady.

After her competition, we drove straight to my son's belt test for karate.  This test was kind of a big deal, so he was really nervous....so nervous, he asked us to stay home.  The fam and I sat in the car and watched through the front windows while he tested.  He had no idea we were even there.  I am proud to say that my son is now a ban-bu belt and is only two belts away from a black belt.  Hi-ya!!!

{sorry for the grainy pic, my husband took it on his iphone}
Is it just me, or is he channeling his inner Napolean Dynamite?  Congrats on your sweet, karate skillsss.

I rarely share personal stuff, mainly because this is a DIY blog and personal stuff just doesn't seem to fit the content.  But, technically, I did make my son and daughter, so I think it counts. 

I have also been working on a dresser revamp for the last week or two, in between my stints as chaffeur, maid and cheerleader.  It was a bit of a challenge since the median temperature here in SLC has been about 35 degrees.  Spray paint and freezing temperatures do not go well together.

It took me a little longer than I expected, but I can finally say...she's done!

She started out in pretty rough shape.  She had a layer of paint that was peeling off.


And underneath ,the finish was a hideous, blonde color with dents, scratches and chips all over. 


I was able to look over all of these superficial imperfections mainly because she had the gorgeous, mid-century style that I absolutely love.

I removed as much of the paint and old finish as I could using Jasco brand painter stripper.


Once I had the majority of the paint removed, I gave her a good sanding and a few coats of spray primer.  I took care to sand in between each coat.


After two coats of primer, I gave her coat of gloss white spray paint.  Once she was finally dry, I sanded her again and applied another coat of spray paint.  In total, I ended up doing about three coats of paint.
I really wanted to do something new and different with this dresser.  After a couple days of thinking about it, I decided to try my hand at using wood veneer.
I used REAL wood veneer that I purchased off of Amazon.com.  I ordered three different colors a dark maple, a light birch, and a natural/gray walnut.  The sheets of veneer I purchased were 2 ft x 8 ft and were around $20-25 a piece.
I liked the way all three woods looked together, so I decided to use a combination of them on the fronts of the dresser drawers.  I was a little nervous at first, having never worked with wood veneer before.  But, I was pleasantly surprised at how easy it was to handle. 

 I simply placed the face of the drawer down onto the backside of the veneer and traced around it with a pen, then cut the piece out.


I could very easily cut the veneer with sharp scissors, eliminating the hassle of using any kind of electric saw.  I was beyond excited about not having to spend any more time in my freezing garage.

Once I had all of my pieces traced and cut out, I adhered them to the drawer fronts using this stanky, toxic crud...which, coincindentally, resulted in an unexpected vanilla pudding craving


{I painted a coat on both the drawer front and the back of the veneer with a disposable brush, as per the recommendations on the back of the adhesive.}  By the time I went to bed that night I had a headache...and the munchies.
The veneer stuck immediately to the drawer fronts, which meant there was little room for error when placing it on.


It took 2-3 days for the adhesive to completely cure and then my dresser was ready to go.  Up until now I had kept her hidden away in my closet, but now I think she deserves to be put somewhere she can be seen.

She turned out pretty great!  She reminds me of a dresser I saw at West Elm a couple weeks ago.

Patchwork Dresser
{source}
I was really impressed by how beautiful the veneer was and how easy it was to work with.  I think I may have found my new, favorite product.


I had previously bought hardware similar to the dresser's origional hardware.  The brushed nickel finish looks great against the natural wood grain.


In total, I spent about $10 for the adhesive, $75 for the veneer and $15 for the spray primer and paint.  That's a grand total of $100.  If I remember correctly, the dresser selling at West Elm was $999. 

Now that's a savings worthy of frostbite and permanent nerve damage!!!