Showing posts with label diy. Show all posts

Tuesday, May 20, 2014

Leather Applique Pillow

Okay, so I know I already boasted about having the easiest project ever…but I lied!

This is the easiest project ever!!!
No, seriously, it literally takes you three minutes and twenty seconds…I timed myself.

All you need is:

A Pillow
A sheet of leather {found at most craft stores}
And a glue gun

Now, you may be asking yourself why anyone would want to take a perfectly good pillow and hot glue leather all over it.  And my answer is…because it's totally rad!

Imagine Spider Man without his spidey suit.  I mean, Peter Parker is perfectly adorable and fine, but the second he dons that spidey suit he is like Sah-weet Butter…am I right?

Ya, well, that's what adding leather to your pillows is like…Peter Parker vs. Spiderman.  And let's be honest, who wouldn't mind Spiderman hanging out on the couch in the living room?

Anyway, moving on!

I mean, this project is so simple it doesn't even need a tutorial, but I'll go ahead and briefly explain what I did.

I plugged in my glue gun and while it was heating up I cut my leather sheet in half lengthwise.  
Then I took my "ordinary" pillow and placed the leather pieces on it to get an idea of spacing.
By then my glue gun was hot, so I glue those babies into place and voila...

Spidey Pillows!!!


All said and done, this project only cost me $7 for the sheet of leather…and if you have a 40% off coupon well then it will only cost you whatever 40% off $7 is {which isn't very much}.

I'm pretty sure I'll be making another one of these {or maybe four or five} because they are so easy and look so good.  More to come on that later.

So, are your Spidey senses tingling now?  Ya, I think that means you should go make one of these leather pillows too!!!


Saturday, May 10, 2014

Geometric Copper Pendant- Tutorial

Have I mentioned how much I love this light?  I am super excited to share the tutorial for how to make it because, well, I'm a giver.  BUT, also because it is fairly simple project that looks way more complicated than it really is.
For the record, I did not enjoy geometry in school.  Angles and the pythagorean theorem…blech!  I'm not ashamed to say that I am geometrically challenged.  I do, however, know that this light is made up of a bunch of equilateral triangles…ba-bam!!!
{Thanks Ms. Grisenti.  See I was listening.}
Anyway, I share this with you because my approach in assembling this project may seem a little haphazard and, well, more complicated than it should be.  So hopefully you can follow me.

Here's what you need to get started:
*22 gauge floral wire {found at any craft store}
*tube cutter {found at any home improvement center for about $7}
*1/4 inch copper refrigerator tubing {I found this tubing at the Home Depot...about $18 for 20 ft.}

I started by cutting 30, 6 inch pieces of of copper tubing.  Note:  If I were to make another light, I would probably increase the length to 7 or 8 inches.  I wouldn't say the pendant is small, I just think I'd like the next one to be a little larger.  Anyway…

This step is the most time consuming {and possibly painful}.  Using the tube cutter is not difficult, but after repeating the process thirty times your fingers will be, well, dead.  This is good task to pass on to the hubby, especially this weekend as it is mother's day and he can't say no. 
 Happy Mother's Ya'll…by the way!

Once all your pieces are cut you can start assembling.  I began by making a triangle.

And continued to make triangles


Until I ended up with this…a pentagon-ish type shape.  Just…you need five triangles!

Then I started adding triangles around the pentagon.

And ended up with a star.

Then next step was connect the tips of all of the triangles with a piece of tubing.

Here's what it will look like after.  It's nearly done.  

You should have five pieces of tubing remaining at this point, which you will attach individually to the five bottom joints of the structure.  Be sure to leave some extra wire coming out the end of the unattached side of the tube for later use.  The arrows in the photo below better indicate which joints I'm referring to.

You can see in this picture where I attached two tubes to the joints and then to each other creating a triangle.  Continue adding tubes and attaching them to the point of the triangle.

Here's what it will look like when all five tubes are attached and secured at the point.
The structure itself is now complete.

At this point, I was scratching my head as to how I would attach the structure to a lamp kit.  Ever the DIY'er I utilized something I have readily available at my house…cardboard.

I set the light on top of the cardboard and traced out one of the triangles.

Then I cut it out slightly larger than the tracing.

I opted to use a lamp kit from Ikea {they cost about $5}.  I centered the socket on the cardboard and traced around it.


And cut it out and made sure it fit snuggly on the socket.  This cardboard piece will become the support for the light structure.

I used some of this


To paint to cardboard and light socket copper so it would blend in with the light.

If you look closely at the picture you can see how the structure is resting on the cardboard.   I actually added some hot glue to to the top of it so it wouldn't slip around.  You may be wondering how a flimsy piece of cardboard is supporting the weight of the light, but surprisingly the light isn't all that heavy.

And then just sit back and admire your handiwork!


Here's a side by side of the inspiration light and my DIY version.
I ended up making two pendant lights and spent about $20 for each.

* $28 for 30 ft. of copper tubing {one light requires approximately 15 ft. of tubing}
* 2 lamp kits from Ikea at $5 each
* 22 gauge wire about $2

...for a grand total of $40!

And a third of the cost of the original.  Happy Mother's Day to me!!!

And again, a Happy Mother's Day to you too!!!

Tuesday, May 6, 2014

{Urban Outfitters} Inspired Geometric Pendant…who knew lights could look so good!

Uh, so, in case you didn't notice, I've been AWOL the past couple months.
  
I won't bore you with the details of my lengthy disappearance, but will simply just say that my family really appreciated my full attention these past few months {and I really enjoyed giving it to them} but I am more than ready to get back to blogging and project..ing!

Which brings me to...

My son's bedroom, which up until recently was pretty much just a box with a bed in it.  Very sad.  Very uncool! 

Which is unfortunate, because Carter's a pretty cool kid...
{except for when he encounters a spider}
so I was feeling the pressure to perform with these lights.  I knew they would have to be pretty awesome to get his stamp of approval.

And then I came across this pendant light on  UrbanOutfitters.com
and I knew I had found my inspiration.

They aren't' ridiculously priced at $69, but I needed two {one for either side of the bed} and didn't want to eat up $150 of my already tight budget.  So, I decided to try and make my own for a fraction of the price.

My DIY version of this geometric pendant{s} cost about $20 {per light} to make…and actually ended up looking equally as cool as the original.  Initially, I had planned on painting the lights gold/brass, similar to the color pictured above.  But once the lights were complete I kinda loved the copper.  I think for a teenage boys room it was the right choice over the gold.


I think I might actually have a crush on these guys.  Carter may be starting to catch on as I stop and admire them every time I pass by his room.   I mean, it's kinda hard not to stare at them, right?

And for those of you interested in kicking up your cool factor, I will be posting a tutorial on how to make these in the next day or two.  You'll be surprised at how easy it is to be cool!


Monday, December 16, 2013

Birch Branch Wreath...mini tutorial.

So, I decided that I really needed a new Christmas wreath for my front door.  I wanted something that would still look festive and fitting for the holiday, but unique at the same time. 

Then the other day when I was at JoAnn's I came across some birch branches.
I love birch...the smooth, round shape of the branches and the white, papery bark.  Ugh, it's just beautiful to me.

The branches at Joanne's were originally $14.99 for one, 48 inch branch but were marked fifty percent off...making them $7.50 each.

This seems to be a pretty good deal from the research I've done.  I also found some birch branches on Amazon.  The price was about $40 for four, 48 inch branches...making them $10 a piece which isn't too bad.

I set out cutting down my brach into 1/4 inch discs...not fun when the miter saw is in the garage and the temperature outside is 15 degrees.  After several cycles of cutting and running inside to thaw out I had cut down my entire branch into an armload of wooden discs.

Then, using piece of cardboard from an old box, I cut out a ring to use as my wreath base.  If you don't have a piece of cardboard lying around you could use foam core board or anything sturdy enough to support the weight of the wreath.
I made the cardboard ring three inches wide and it measured approximately 15 inches in diameter.  You can adjust those measurements to you liking if you want your wreath bigger, smaller, wider, thinner...

Then I used my trusty old glue gun to attach all of the discs to the cardboard ring.
I started by attaching a row of discs down the center of the cardboard ring, then added a row on either side of it.  It's okay if the discs hang over the cardboard because you won't see it anyway.

Then I just continued layering my wood discs.  I added two more rows on top of the bottom three to cover the gaps, then finished with one more row on top.

 
The finishing touch was this aztec print bow at the bottom of the wreath.

And here's how it looks on my turquoise door...that I'm still debating on painting, but can't decide what color.


I love the earthiness of this wreath.  It would look great in a farmhouse style home, but would also look great in a modern styled home.  It's super versatile.  I also love that you could leave it up on your front year round if you wanted too.  And the thing I love best of all, that it only cost me about $10 to make it.

Birch branch...$7.50 {Joanne Fabric and Craft}
Black and White Aztec Print Ribbon...$4 {Joanne Fabric and Craft}
Glue...{free- already on hand}
Cardboard Ring...{free-from an old box in the garage}

Four words peeps...Merry Christmas to Me!


Tuesday, December 10, 2013

{3} Chic DIY ornaments out of embroidery hoops!

Well, I'm back from vacation and Christmas is, like, two weeks away.  I feel a little frantic.  Taking off the first week of December {and last week of November} has a way of doing that I suppose.

I'm sure you already have your Christmas tree up and decorated, but if you're like me you still continue to add to it up until the "big day".

So, If you are looking for some inexpensive ways to spice up your Christmas tree {or just have a few odd holes that just need filling}, these DIY ornaments will do just the trick.

This isn't the first time I've utilized embroidery hoops.  I used them to make some decorative sphere's  awhile back...


and 

also this really cool yarn wrapped wall art  for above my bed.


I love working with embroidery hoops for {two} reasons.  One, they are wood, need I say more?  And two, they are really inexpensive {and easy} to work with.  

For this project I used the smallest hoops I could find...I think they were 2 and 3 inch hoops.

I simply took them apart {each hoop comes with two hoops...an outer one with a metal clamp used for tightening and then an inner one} and then just messed around with them until I came up with something I thought looked decent.

The first ornament I call simply...sphere.


The second I call...spooning circles.

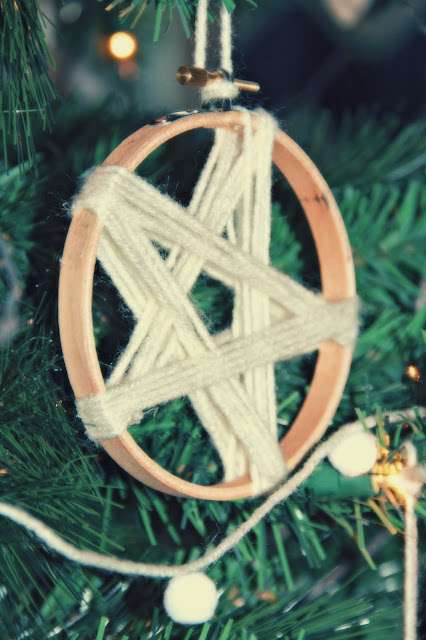
And the third ornament I call...the one with a yarn star {because as we all know, anything wrapped in yarn is totes cool!}

I spent about $1.50 and 5 minutes on each ornament.  Ahh, I love things that cheap, quick...and totally rad!!!  Don't you?