
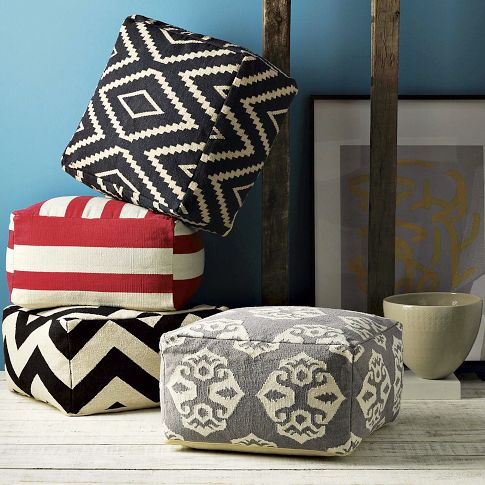
Wanna know how a couple of these striped rugs

become this cushy piece of bum lovin'?

Well, sit down and relax. Let me start from the beginning.
I happened upon these beauties a while back whilst browsing on West Elm's website.


Well, sit down and relax. Let me start from the beginning.
I happened upon these beauties a while back whilst browsing on West Elm's website.
What a great {and fashionable} extra seating option, I thought.
{I don't know how it is at your house, but when we get the whole fam together, it always seems like we are running out of seating. Someone inevitably ends up sitting on the floor, or we end up redecorating by pulling chairs in from every room in the house. That's all fine and good, family get togethers don't happen all that often, but I thought that next go around I'd make it easy on myself and get some floor poufs. They are light, easy to move around and "totally in" right now.}
If money were no option, I probably would have just bought them directly from West Elm. But, since I do not have that luxury, I had to do the next best thing...knock 'em off.
I don't know if I am just picky {or cheap...or both}, but I couldn't find any fabric that "spoke" to me. I was hoping to have one of those "long lost lovers reunited moments", you know, where the fabric just appears-totally engulfed in angelic light and I'm so overcome with emotion that all I can do is crumble to the floor crying. Anywho, it didn't happen. So I just went home. And that's when I saw these little babies hanging on my banister.
 No angelic light, no overflowing of emotion. But hey, whatever.

They are $3 rugs from IKEA. I had bought three of them not really knowing what I'd do with them, but after looking at them, I realized that they would be an inexpensive and durable option. So I totally ran with it...and hey whadaya know. I love 'em...not fall on the floor and cry, love 'em, but almost.
All you need is:
mediocre sewing skills {by that I mean, the ablility to "fudge it" a little and sew in a straight
line}.
Three, $3 IKEA rugs
All you need is:
mediocre sewing skills {by that I mean, the ablility to "fudge it" a little and sew in a straight
line}.
Three, $3 IKEA rugs
A Zipper {optional, but with five kids I needed my pouf cover to be removable/washable...this is where my fudging skills came in...didn't know how to sew in a zipper til I did it. The zipper needs to be as close to the size of the opening as possible...my zipper was 22 inches.}
Filler {I found bean bag filler at K-Mart for $12.99 a bag. You can use fiber fill, old car parts...whatever floats your boat, but I wanted my pouf to maintain its shape and be extra comfy for my keister. I ended up using a little over one bag}.
And maybe some extra sewing needles since I broke three during the course of the project.
I started by cutting down one rug into two pieces.
One piece should measure 23in x 23in{or close to that, the widths of the rugs vary from 22 1/2 inches to 23 1/2 inches}, and the other piece should measure around 12in x 23in {again, it's super hard to be totally exact, because each rug is just slightly different in size}.

Cut down a second rug the exact same way. You should now have 2- 23in x 23in pieces, and 2- 12in x 23in pieces.
Finally, cut your third rug down so that you have an additional 2- 12in x 23in pieces...for a grand total of 2- 23in x 23in pieces and 4- 12in x 23in pieces.

Now for the fun part...sewing. I'll let the pictures do the talking, sound okay?


piece 6 is the second, 23in x 23in piece

once all six pieces are attached, you need to sew the corners. The white arrows indicate where you should do this.

Here's what it should look like after the corners are sewed together.


Now you need to attach two sides of the bottom of the pouf. The picture indicates where to do this.

Here's what it will look like after the two sides are sewn. You should have only one side left unstitched now.
That opening is where your zipper will go...if you want one. If you don't want a zipper closure, you would stitch this opening closed, leaving a small area open to allow for adding stuffing/filling. You could then, either hand stitch or machine sew the opening closed after filling.

I realized after I'd made it to this point, that you want both edges hemmed so they have a nice, clean edge. I lucked out, one of my edges was the selvage edge of the rug, but the other I had to hem under.

I turned the pouf ride side out, and slid one side of the zipper under one side of the opening. I pinned it in place and sewed the length of the zipper.


Then I unzipped the zipper so that I could work with the other side. I did the same as before, and slid the other side of the zipper under the other side of the opening, pinned and stitched the length of the zipper.

At this point, you could turn your pouf inside out and reinforce the zipper by stitching just above the top of the zipper, and just below the bottom of the zipper. My zipper was just slightly shorter than the opening, so I had a little gap at one end that I needed to hem shut. If you run into this same problem, it's no big deal.
Here's what the final product should look like.

And here's what it should look like after getting filled.


I ended up making two of these bad boys. I spent $18 on 6 rugs, $39 on three bags of filler, and $5 on two zippers...for a grand total of $62 {or just over $30 for one pouf}. The cheapest pouf I found on West Elm was $219. That's a savings of $190. Boo ya! You could save a little more money by using a different filler, but I really wanted my poufs to maintain their shape and have a little firmness to them so I splurged and got the good stuff.
I can't wait to test 'em out tonight and catch up on a little T.V.
LOVE it so cute :) I pinned it! wanna make me one ;) hehe
ReplyDeleteThanks lady! I can't wait to see how yours turns out.
DeleteVery nice. It's a great idea, and I sure wish my sewing skills were that decent even fudging a lot-lol. I love the rug colors especially.
ReplyDeleteo MY! YES YES. I will make asap too! love this idea. You are so smart to think of this.
ReplyDeleteGreat job, way to think outside the pouf...er..box!
ReplyDeleteOMG! It's so adorable! I've been wanting a pouf for awhile now... great idea to make your own! Looks do-able too! LOL!
ReplyDeleteTania
um. pure genius. these are lovely!
ReplyDeletecome visit my blog anytime!
michele
http://hellolovelyinc.blogspot.com
This is awesome, I wish I had an Ikea near buy, but I'll have to try to find some similar rugs elsewhere.
ReplyDeleteWOW!!! Thanks for the tutorial! Great idea.
ReplyDeleteJaniene
http://bishopsfamilysite.blogspot.com/
This is an awesome idea! Thanks for sharing this tutorial. I am definitely going to be making some of these for the house. We have lots of company over all the time and run into the same issues with chair or floor time...lol!
ReplyDeleteA great idea to use the Ikea rugs. I made something like this to store the endless stuffed animals in my sons' bedroom. They love taking them all out and restuffing.
ReplyDeleteI was just at Ikea, now I wish I saw this before I went. I'll have to try this out soon.
ReplyDeletehttp://ineversaiditwouldbeeasy.blogspot.com/
Whoah, awesome! I love the stripes too.
ReplyDeleteSuch a fun idea!! Thanks for sharing!!! And what a small world it is......I'm a good friend of Michell Bell.....old aerobics pals :: Love her and her books!! :)
ReplyDeleteHi Julie. Thanks for stopping by my place. I happen to love Michele as well. She's my big sister. I'll be sure to mention that I met one of her "old aerobics pals" on the internet.
DeleteReally great idea.... I've had a couple of coffee sacks lying around and wanted to dothis for ages...you've put the boot up me now. I'm off to start doing them. The goal... to post on my blog in a couple of days!
ReplyDeleteI have 3 of these IKEA rugs, 2 we used to sew into pillows and one as a normal mat at our front door. I love them! For being $3 bucks, they really feel like they'll last a long time and they come in so many different styles and colors. This looks like a really great DIY - I just need my mom and her sewing machine to come over and show me the ropes!
ReplyDeleteKristina
Nook & Sea
Wicked project....I'm gonna make one for each of my 3 kids!
ReplyDeleteJen
NY, NY
These are awesome!!! Do you happen to know what the link is for these floor mats on Ikea's website? Our closest Ikea is 400 miles away. :-(
ReplyDeleteHi Trissi. I wasn't able to find the rugs online either. The last time I was at Ikea, a week ago, I couldn't find them anymore. I hope they didn't get rid of them.
DeleteDoes anybody have a link to the IKEA rugs?! I can't find them online :(
ReplyDeleteHi Amy! I looked for the rugs online and couldn't find them. In fact, when I was at Ikea last week I couldn't find them either. I really hope they aren't gone for good.
DeleteI have some vintage burlap coffee sacks with this great purple & green stitched writing. I boughtat an antique store thinking I'd do something like this. Do you think this could work with burlap sacks? They are already stitched on three sides (like a pillow case). I'm thinking I could stuff them as is & just close the last seam. It would be more of a rectangular ottoman pouf. What do you think?
ReplyDeleteI love the idea of using burlap sacks. Not only would they be super attractive, they would also be very durable. If you stuff them as is...like a pillow case, they may look more like a floor pillow rather than a pouf {which is a little thicker}, but I still think that they would look great...especially if you have enough sacks to make a few of them. I'd love to see pics of the finished project. Good luck.
DeleteStopping by from Pinterest. Love this idea, and I'm excited to try it even with my non-existent sewing skills. Thanks for the great instructions!
ReplyDeleteDarling idea!
ReplyDeleteI used the same pellets from Kmart to fill a Morrocan pouf but I didn't like how wobbly it felt so I stuffed a few towels in the bottom to give it more sure footing. It worked perfectly!
Kristi, what a fab idea. I would have never thought of it. I will definately try it out next time.
DeleteI'm using your pattern with some old muslin and coffee sacks- I'm stuffing with old fabrics and sheets to give it structure, which is what the old-school Moroccan origins of this were stuffed with- cause friggin no way I'm cleaning up those tiny beads for the rest of my life when the kids jump and bust one! :) great instructs- thanks heaps!
DeleteThis comment has been removed by the author.
ReplyDeleteNice job! Love the thickness of the rug to make it a more durable poof. I just might have to try this. Thanks for sharing and making it look so easy.
ReplyDeleteI am so excited to try this! I have these rugs in my kitchen now.
ReplyDeleteLove these! Could you use any type of fabric? I was planning on filling it with packing peanuts as they are cheaper to by than the beads, whaddya think?
ReplyDeleteHi nicci. I think packing peanuts sound like a great idea. I wish I had thought of it.
DeleteI wonder if you could stuff these with those plastic bags you get from the grocery store?! Great way to recycle those...
ReplyDeletethese are so cute!! I saw this on Pinterest and wanted to see if there really was a tutorial :) (sometimes people pin stuff and then don't bother to look if there's any real info behind the photo!) Thank you so much for sharing such a detailed tute. I hope to make these soon!
ReplyDeleteJust found your blog via interest because I have seen those West Elm poufs for a while and LOVE them! Can't wait to try this. Thanks so much for the inspiration!
ReplyDeleteREALLY cute. I don't need a pouf, but couldn't help but stop by when I saw this on Pinterest. LOVE the idea! I think my mediocre sewing skills could totally tackle this too...now if i can just find some cute rugs on my next IKEA trip (scheduled soon since my list is growing rapidly). SO dangerous having one near by!
ReplyDeleteLove this! Found you via Curbly, and definitely pinning this for a future poof project!
ReplyDeleteErin @ The Great Indoors
Love this! Found you on craftzine.com
ReplyDeleteLove, love and love these. I need about a dozen of them.
ReplyDeleteWhat a great site. Right up my alley with lots of fantastic ideas. So many ideas and such little time. I'll be bookmarking your site and checking back often.
Thanks for posting such fun projects.
Wow! I've been gushing over $200+ West Elm poufs (while my husband grumbles). We will definitely attempt this project... as soon as we finish pouring our concrete floors. :) Thank you for sharing -- great read!
ReplyDeleteWonderful tutorial. Easy to follow & great pictures. Thank You!!!!!!
ReplyDeleteawesome idea! Genius in fact.
ReplyDeleteI HIGHLY suggest you sell these on Etsy. If you just doubled the cost of production, they'd still be cheaper than what people can get elsewhere, yet you're making a nice profit. :)
ReplyDeleteThese are super cute! just curious - did you put the beanbag fill in something before inserting into the cover? If not, when you wash it do you just dump it out? ... - rebecca
ReplyDeleteRebecca, I thought about putting the filler in a bag first, but decided to just fill it without. The zipper enclosure makes it fairly easy to remove the majority of the filler. I also wondered after little bodies plopped themselves down on the pouf a couple of times, if the bag would end up popping or ripping open anyway.
DeleteHi Erika,
DeleteThe tutorial is just great. It makes a no sewing person like me also to try it. Just wanted to know what items can be used to fill these. Also please advise do we need to use only thick cloth or thin ones can also be used somehow.
Thanks in advance!
In your post, you said you put the zipper so you could remove it to wash it.. if the filler isn't in a bag or anything, how do you do that? Just curious :) I've been wanting an ottoman and I've got little hands and lots of food EVERYWHERE. Hoping to find a way to do this without a mess :)
DeleteI LOVE THIS! Genius. Mind if I share on my blog? You'll get all the credit, of course :)
ReplyDeleteOh my word! Thank you! And yes, share away!
DeleteI really want to make this , but I can't find those Ikea mats anywhere. What kind of fabric would you recommend using if I went an alternate route.
ReplyDelete(lovely site by the way!)
Hi Tifa! If I were to make another one, I would try to find a really durable, canvas type material...something heavy with a really tight weave. If you go to a fabric store, ask the cute little ladies behind the cutting counter. I always appreciate the second opinion they offer and if they have something more appropriate in mind they can direct you to it. Thanks for stopping by!
Deletegreat post! do you mind sharing what filler you used?
ReplyDeleteHello there tangerine freckles {love the name}. I used bean bag filler. I picked mine up at KMart for about $15 a bag. One pouf required about a bag and a half. One commenter also suggested trying packing peanuts. She thought it would be a little cheaper. That may also be an option, although I haven't tried it myself. Thanks for stopping by the place!
DeleteYou make a great point. If only I could teach the kiddies how to make them...then I'd really be in business. Thanks for stopping by.
ReplyDeleteLove this idea!! My daughter is a new teacher and is looking for inexpensive seating for the reading area, I think this will be terrific. I am thinking that the "new" laminated fabric might be a great substitute for the rugs and easier to wipe clean in a class room, any thoughts?
ReplyDeleteOoh ya. I love that idea. Something vinyl-y or pleather-y would probably be very durable and look great too.
DeleteAwesome...running out now to Ikea to get started on mine!
ReplyDeleteHi, awesome tutorial! I am definitely feeling brave enough to try this. I have made basic pillows in the past and wanted some cheap fill as it can be quite expensive. if you can pick up a stash of cheap t- shirts/sheets etc from a second hand shop you can stuff it with that, then use a small amount of fibre fill around the edges to plump it so it's not lumpy. Works a treat and fairly simple to empty out when you want to wash it. Thank you for this post, found via pinterest :)
ReplyDeleteLove this! The texture in those IKEA rugs is perfect for a rustic style pouffe.
ReplyDeletePinned!
Hi,
ReplyDeletewhat a surprise for me. I had exactly the same idea when I saw the west elm ones pins. I made mines for the same kind of rugs. I found very difficult to work with the 'fabric'. I hemed every piece before cutting, but still i have some rips after my kids sit on them. also I made a handle with un old leather belt, so we can carry it everywhere. I am going to make two others for my grils room, so if you have any more tips for the fraying please help.
Sophie
P.S. sorry for my English :)
Hi Sophie. You know, I've had a few little problems with fraying as well. If I make them again I think I might try zigzag stitching on a very short stitch to see if that might resolve that problem. I love your idea of using an old leather belt for a handle. Genius!!!
DeleteThank you for your quick reply. I will try it.
DeleteI love your site, btw.
I think the best method would be to use a serger, but wouldn't buy one for just this purpose...maybe a friend has one you could use and give her a pouf! There's also a product called Fray Check you can find at sewing shops.
DeleteLove this idea! Thanks.
Love! Awesome idea!
ReplyDeleteGreat tutorial. Thanks for sharing.
ReplyDeleteAmazing!
ReplyDeleteThank you for posting this DIY Project, we enjoyed it so much that we're sharing it with our followers!
ReplyDeleteThank you,
Emily
East Hill Cabinetry
www.EastHillCabinetry.com
www.facebook.com/EastHillCabinetry
Hi Erika.
ReplyDeletei also found this on pinterest. I am new to blogland and pinterest and am amazed at the generosity of people. So many great ideas being shared and this one is fantastic. i am working on a chubby house for my girls at the moment and these will be a great addition. I am using painters' dropsheets from the hardware as curtains as they are durable. I think they are a good option for your poufs too as they are inexpensive. I am going to spray paint patterns directly onto them. I'll let you know how i go.
Thanks for sharing.
Gill
Painter's cloth is a great idea...you can even dye it or paint a design on it!
DeleteHi Erika.
ReplyDeletei also found this on pinterest. I am new to blogland and pinterest and am amazed at the generosity of people. So many great ideas being shared and this one is fantastic. i am working on a chubby house for my girls at the moment and these will be a great addition. I am using painters' dropsheets from the hardware as curtains as they are durable. I think they are a good option for your poufs too as they are inexpensive. I am going to spray paint patterns directly onto them. I'll let you know how i go.
Thanks for sharing.
Gill
fantastic idea! thank you for sharing!
ReplyDeleteThis is a FAB tutorial - thanks! On the zippers, you might try installing it on any one of the straight edges during steps 1-4 - they sometimes are a little easier to do when you don't have to contend with the whole garment/item.
ReplyDeleteBrilliant idea!
ReplyDeleteSo cool!! Do you have to use a sewing machine for this or can you stitch by hand?
ReplyDeleteHi there! You know, I would highly recommend using a sewing machine just for ease and durability. However, I'm never one to discount alternative options. I imagine it's possible to stitch by hand, but I just don't know how durable the end product would be or how long it might take to complete. I hope this helps. Thanks for stopping by.
DeleteThis is such an awesome idea! Now I have to make it to Ikea...
ReplyDeleteHi Erika,
ReplyDeleteI was wonder what kind of sewing string you were using? I would imagine it would have to be pretty thick? Please let me know! And you did use a sewing machine to do this? Thanks!
Also all friends looking for durable material I just bought three rugs from WEST ELM itself for 7$ a piece :) they are durable and cheap. I'm excited to get started once I know what to sew them together with!
Hi there! You know, I just used regular old general purpose thread, BUT, if I had it to do over again I would most definately surge all of the edges. I have had to repair a couple of holes in the seams due to kids running and jumping on the poufs. If you don't have a surger, you might be able to get away with a really tight zig zag stitch. I think these two options will add more strength to the poufs than even a heavy duty thread would. Hope this helps. Thanks for stopping by the place. Oh, and thanks for the tip about West Elm...headed to their site now.
DeleteJust a thought to save money: Find an old bean bag at a garage sale and use that stuffing!
ReplyDeleteI found you via Pinterest and used this tutorial to make my own! Thank you so much for the great tute! I blogged about mine here
ReplyDeletehttp://www.doodlela.com/2013/03/accidental-storage-awesomeness.html
All the best,
Celeste
Oh your pouf idea is soooo cool and they look beautiful (loved the price too!!)! I've got this linked to my DIY poufs post too today - for inspiration! Have a wonderful day!
ReplyDeleteOH my when I saw your floor pouf... well the heavens parted and the sun came out. Literally! (and figuratively as well!!) Yes I simply adore this idea, especially with the rug. I currently have the materials on hand. Let's see... 3 cool rugs not being used, super duper durable painter's cloth, and coupon's for 50% off at JoAnn's for the bean bag filler. Oh boy! I can see some of these in my somewhat near future! With 3 teen boys and a small house, we need these desperately! Thank you so very much! (so sorry to see you comments got hacked/spammed! ugh)
ReplyDeletei look forward to trying this soon
ReplyDeleteThanks for blog on Entrance Floor Mats . This is good idea that how to use Floor mats .
ReplyDeleteSuch a great pattern- I'm going to whip mine up this weekend- with a few adjustments. First, for those who bash on about not being able to sew, I am hand-sewing. Second, I am using old coffee sack free from a coffee roaster locally- ;) and I am stuffing with some old fabrics and sheets- no plastic-y horrid balls of foam haunting my house when one of my children kindly jumps and splits it! :) Let ya know how I go- thanks heaps for the pattern
ReplyDeleteGreat pattern! It took me about 3 hours to make it- my first time sewing a zipper- and I used the bean bag filler. It is a good size and firm, perfect as a pull up chair to play cards around the coffee table. I put the bean bag filler in a large (thin) plastic bag first to make it easier to remove in case I need to wash it. Thanks for posting!
ReplyDeletehttp://www.ikea.com/us/en/catalog/products/90267066/
ReplyDeletehttp://www.ikea.com/us/en/catalog/products/90267066/
ReplyDeleteLove how durable using a rug is! Great idea! I made a pouf a year or two ago, using the KMart styrofoam bag filler too, and it totally lost it's umph after a while. The little beads squish down after being sat on so much. So I recently reopened my hand stitching and filled it with some good quality batting. Which I assume will also flatten out after a while, but for now it's nice to have it full again. Haha, I just realized it's like the cycle of nursing to post-nursing...
ReplyDeleteLove how durable using a rug is! Great idea! I made a pouf a year or two ago, using the KMart styrofoam bag filler too, and it totally lost it's umph after a while. The little beads squish down after being sat on so much. So I recently reopened my hand stitching and filled it with some good quality batting. Which I assume will also flatten out after a while, but for now it's nice to have it full again. Haha, I just realized it's like the cycle of nursing to post-nursing...
ReplyDeleteI've had some NFL floor rugs forever. I absolutely love them but I haven't used them as actual rugs because I don't want feet all over them. I've been trying to decide what to do with them and this is just the perfect option. I can make them into little poufs that won't get as much wear and tear as a rug would.
ReplyDeleteShelly Slader | http://www.americangiftstore.net/default.asp?dept_id=24000
This tutorial is really useful and can be easily used to make pouf. I love to say that you did great job.
ReplyDeletepoufs
I have been wanting to do this for awhile and upcycle an old bean bag by using the filler. What do you recommend that I put the filler in before putting it in the bag? I want my cover to be removable and washable. :)
ReplyDeletehey! very nice blog. idea is also great. I like the way hoe it turned out. Thank you for sharing. kilim area rugs
ReplyDeleteCan we use these as covers for some carton boxes filled with some material? I want to cover those boxes and make them useful too. But need to be easy to remove. I loved your this design.
ReplyDeleteYou have some skills there fella, keep up the good work and keep on sharing. Thanks for all your tips....
ReplyDeleteZ-Channel Metal
Online Metals Shop