Showing posts with label pouf. Show all posts

Saturday, June 1, 2013

Pouf!

A few posts ago I mentioned seeing some floor mats that I thought would make awesome floor poufs. 

 Well, when I stopped back in Target recently I noticed that said mats were on clearance so I grabbed a few.

I decided I would use the rugs to make a couple of poufs for the deck.  Ever since I found this little gem at Ikea for $60 
and since summer is only days away, I decided now would be a good time to spruce up the patio and create a welcoming outdoor living space.

The floor poufs will add some extra seating if needed, but will also serve as tables for placing unused magazines or resting drinks on.  They will also work well as foot rests.  

I actually referred to my original floor pouf post for making this pouf.  
I ended up purchasing runners instead of the 2x3 mats, which meant I only needed two rugs to complete this project.  If you were to use 2x3 mats, you would need to use four of them.
Since the Target rugs were not quite as wide as the Ikea rugs I used the first time, I had to readjust my measurements.  For the Target mats, I ended up cutting two 19 1/2 in. x 19 1/2 in. pieces and four 19 1/2 in. x 10 1/2 in. pieces.  After that I followed the step by step instructions I outlined in the post.  
Please note that if you use a floor mat/rug for this project {any durable upholstery fabric or canvas would work great too} you will have to address the fraying issue on the cut ends of the rug.  If you have access to a surger, I would recommend surging all of the ends.  If you don't have access to a surger you can do what I did, which was zig-zag stitch my pieces together right along the edge, then zig-zag stitch again leaving about a 1/4 in. seam allowance.  Then I straight stitched over the zig-zag stitch just to reinforct it.  I did this because the weave on these floor mats is so loose that if a child jumps on them {like mine did} or adults use them as seating, the seam can gets loose and will eventually fray to the point of separation.

Okay, on to the good part...the reveal!
I love these poufs!!!  I loved my first poufs too, but these I love, love because they are so bright and fun.  They are going to look great out on the deck.

I can't wait to get the spaced all spruced up and ready for summer entertaining.  I'm so ready for the sun...and some leisurely fun!!!

Are you all just as ready for summer as I am?  We still have a week left of school, but honestly, I checked out weeks ago.


Thursday, May 16, 2013

I'm back, a cheap find and an update.

Hello!  
It seems like forever since I last posted.

Bora Bora was amazing and beautiful.  I got a massage, petted a puffer fish, grafted coral, lounged around, strolled the beach collecting seashells, took a bath (boy how I had missed soaking in tub), got a nasty lil sunburn, caught up on some Burn Notice {I know, kinda lame}, got stuck in a local political parade and actually finished a book.  

Here are Studs and I just getting to the resort.  Can you believe how beautiful it is?  They say French Polynesia is 50 shades of blue and judging by the this picture I can see why.  There was blue everywhere...above and below.

Here is where we stayed...yes, in a bungalow over the water.  It was crazy.  There were windows in the floor so that you could see down into the water.  We never saw any marine life, but it was still very cool.

Here I am lounging on the beach reading a book by the lagoon.  There was all sorts of marine life in the water...coral, anemone, sea cucumbers {so gross}, clown fish, puffer fish, farmer fish and these odd fish that were really long and skinny.  They kinda freaked me out because they reminded me of barracuda (even though they didn't really look like them).  There was also a porcupine/blowfish that hung out in one of the lagoons.  He was always in the exact same spot.  I became quite a accustomed to him greeting me everyday as I'd walk over the bridge to the main beach.
 

These are just a few of my finds whilst meandering down the beach one day.  I thought it was pretty cool to find a conch shell just laying on the beach.  Almost every seashell had a hermit crab living in it, so I thought myself lucky to have found one without a resident.

The vacay was absolutely amazing and I was very sad to leave.  We made some great friends and great memories, but I was anxious to get home and see my babies.

Twenty minutes after the plane landed in SLC, I was off to the orthodontist for my son's appointment.  A few hours later I was sitting at my daughter's violin recital.  And later that night I was cleaning up puke.  I've been cleaning up puke for the past week, but I think we are finally over it.  WELCOME HOME MOM!

Anywho, on to something DIY-ey.
I've had a lot of people contact me about my diy floor poufs.  The most commonly asked question I get is, "does Ikea still sell the rugs I used"...to which I have to respond, no.  I have not seen the $3 rugs I used at Ikea for awhile.  That doesn't mean they won't start carrying them again, but...
So, I made it my personal quest to find a proper replacement for anyone who still might wanna make some.  And what do you know, today while I was at Target I came across these awesome floor mats.  The first thought I had was how awesome they would look as floor poufs.

I love the bold, colorful striped pattern.  You could have so much fun accessorizing around them.

They are made from a sturdy, canvas-y type fabric, that would be perfect for a floor cushion.  And I figure since they are durable enough for feet to walk all over them, they should be durable enough for bums to sit all over them, right?  The fabric doesn't look like it will fray as bad as the Ikea rugs either {I would still definately recommend surging or using a short, zig zag stitch for all of the seams!}

The only complaint I have is that these rugs are $12 rather than $3, but  I figured they would still result in a significantly cheaper floor pouf than if you were to purchase one from West Elm for $200.  If my sewing machine quits acting like a pile of poo {or Studs lets me buy a new one} I am thinking of making a few for the outside deck.

In other news, we are back in business with the bathroom.  I feel a bit ashamed to share this, but because of all of the road blocks we've run into during the remodel we've decided to have a contractor friend come finish the job.  Studs was also recently promoted at work and has been swamped with work.  So, as sad as I am to hand my baby over to someone else, I think it's for the best.  The contractor said he could have it done in three weeks.  Yee haw!  I'll be sure to post pics as things progress.


Wednesday, May 2, 2012

From $3 IKEA floor mat to flippin' fabulous floor pouf.

Wanna know how a couple of these striped rugs


become this cushy piece of bum lovin'?

Well, sit down and relax.  Let me start from the beginning.

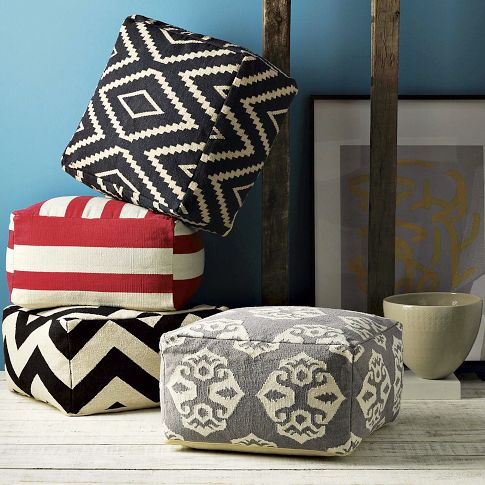
I happened upon these beauties a while back whilst browsing on West Elm's website. 
What a great {and fashionable} extra seating option, I thought. 
{I don't know how it is at your house, but when we get the whole fam together, it always seems like we are running out of seating.  Someone inevitably ends up sitting on the floor, or we end up redecorating by pulling chairs in from every room in the house.  That's all fine and good, family get togethers don't happen all that often, but I thought that next go around I'd make it easy on myself and get some floor poufs.  They are light, easy to move around and "totally in" right now.}  

If money were no option, I probably would have just bought them directly from West Elm.  But, since I do not have that luxury, I had to do the next best thing...knock 'em off. 

I don't know if I am just picky {or cheap...or both}, but I couldn't find any fabric that "spoke" to me.  I was hoping to have one of those "long lost lovers reunited moments", you know, where the fabric just appears-totally engulfed in angelic light and I'm so overcome with emotion that all I can do is crumble to the floor crying.  Anywho, it didn't happen.  So I just went home.  And that's when I saw these little babies hanging on my banister. 
No angelic light, no overflowing of emotion.  But hey, whatever. 

They are $3 rugs from IKEA.  I had bought three of them not really knowing what I'd do with them, but after looking at them, I realized that they would be an inexpensive and durable option.  So I totally ran with it...and hey whadaya know.  I love 'em...not fall on the floor and cry, love 'em, but almost.

All you need is:
mediocre sewing skills {by that I mean, the ablility to "fudge it" a little and sew in a straight
line}.
Three, $3 IKEA rugs
A Zipper {optional, but with five kids I needed my pouf cover to be removable/washable...this is where my fudging skills came in...didn't know how to sew in a zipper til I did it.  The zipper needs to be as close to the size of the opening as possible...my zipper was 22 inches.}
Filler {I found bean bag filler at K-Mart for $12.99 a bag.  You can use fiber fill, old car parts...whatever floats your boat, but I wanted my pouf to maintain its shape and be extra comfy for my keister.  I ended up using a little over one bag}.
And maybe some extra sewing needles since I broke three during the course of the project.

I started by cutting down one rug into two pieces.

One piece should measure 23in x 23in{or close to that, the widths of the rugs vary from 22 1/2 inches to 23 1/2 inches}, and the other piece should measure around 12in x 23in {again, it's super hard to be totally exact, because each rug is just slightly different in size}.
  
Cut down a second rug the exact same way.  You should now have 2- 23in x 23in pieces, and 2- 12in x 23in pieces.

Finally, cut your third rug down so that you have an additional 2- 12in x 23in pieces...for a grand total of 2- 23in x 23in pieces and 4- 12in x 23in pieces.


Now for the fun part...sewing.  I'll let the pictures do the talking, sound okay?


piece 6 is the second, 23in x 23in piece

once all six pieces are attached, you need to sew the corners.  The white arrows indicate where you should do this.

Here's what it should look like after the corners are sewed together.


Now you need to attach two sides of the bottom of the pouf.  The picture indicates where to do this.

Here's what it will look like after the two sides are sewn.  You should have only one side left unstitched now.
That opening is where your zipper will go...if you want one.  If you don't want a zipper closure, you would stitch this opening closed, leaving a small area open to allow for adding stuffing/filling.  You could then, either hand stitch or machine sew the opening closed after filling.

I realized after I'd made it to this point, that you want both edges hemmed so they have a nice, clean edge.  I lucked out, one of my edges was the selvage edge of the rug, but the other I had to hem under.


I turned the pouf ride side out, and slid one side of the zipper under one side of the opening.  I pinned it in place and sewed the length of the zipper.


Then I unzipped the zipper so that I could work with the other side.  I did the same as before, and slid the other side of the zipper under the other side of the opening, pinned and stitched the length of the zipper.


At this point, you could turn your pouf inside out and reinforce the zipper by stitching just above the top of the zipper, and just below the bottom of the zipper.  My zipper was just slightly shorter than the opening, so I had a little gap at one end that I needed to hem shut.  If you run into this same problem, it's no big deal.

Here's what the final product should look like.

And here's what it should look like after getting filled.


I ended up making two of these bad boys.  I spent $18 on 6 rugs, $39 on three bags of filler, and $5 on two zippers...for a grand total of $62 {or just over $30 for one pouf}.  The cheapest pouf I found on West Elm was $219.  That's a savings of $190.  Boo ya!  You could save a little more money by using a different filler, but I really wanted my poufs to maintain their shape and have a little firmness to them so I splurged and got the good stuff. 

 I can't wait to test 'em out tonight and catch up on a little T.V.