Showing posts with label artwork. Show all posts

Monday, October 7, 2013

I heart art!!! {3} inexpensive ideas for awesome art!!!

I love art...especially interesting, creative and one-of-a-kind art.  Rarely do I ever buy pre-done artwork...unless it's photo's of my kiddos.

Here are three inexpensive ideas for great artwork.

1.  Use pictures from old magazines or books.

My favorite pictures currently are from an old drawing book I picked up at the thrift store for $2.  I was able to get eight pieces of usable art from the book which works out roughly to 25 cents a picture.  Pretty awesome, right?

Here are my two favorites...

Animal inspired art is really hot right now, so I was beyond thrilled when I came across these deer images. 

They were perfectly fine, as is, but I wanted to customize them.  So, I colored in the antlers with a pink colored pencil.


Hard to believe these pictures only cost me a quarter a piece.


2.  Frame attractive cards and stationery.

I was recently at Target and somehow found myself in the card/stationery area.  I noticed this set of stationery on clearance for $3.  

The set came with three different patterns which worked out roughly to be $1 per picture.

Tribal prints are very "in" and I love the color combination of navy, peach, mint and orange.

 These letter sheets are every bit as functional being looked at as written on.


3.  Let your kids take the "creative reigns".

Framing your children's artwork and displaying it not only helps their self esteem, but also encourages their creativity...which I totally advocate.

I love the primitive and simplistic way kids see the world and how that translates onto paper.  This picture my daughter Avery drew makes me smile every time I see it.

I'm not particularly fond of the blue mat, but that can be changed easily enough.

I love they way the baby deer looks like it's totally freaked out by the the big deer.  It cracks me up.
This picture is one of my favorite.  Not only was it free, it is also one of the most sentimental pieces of art I have in my house.  Just plop down a pad of sketch paper in front of your kiddos and watch the creativity fly. 

So, what's the tip of the day...artwork doesn't have to be expensive in order for it to be worthy of being called art.  Try to channel your inner child and look outside the box when it comes to finding things to frame and put on your walls.     


Tuesday, October 9, 2012

The Last 3 Weeks {In Review}

I can't believe it's already almost the middle of October

The past month was so busy and seemed to fly by at warp speed. 
The last few weeks have definitely been an adjustment as I've eased myself into the role of preschool teacher.  It's been a lot of fun, but a lot of work too.  Sadly, the ole bloggy has taken the brunt of my neglect, but I'll do my best to still post as regularly as possible.

Now that I am limited to only a couple days a week to devote to "my projects" I've had to be very deliberate in what I choose to do.  The projects have become less "experimental" and more "necessary".

One of those recent necessary projects was cleaning up a little spray paint mishap that occured in the laundry room.  My washer seems to thrash about during the spin cycle like a caged beast. Well, a couple weeks ago, during one of the "destructive" spin cycles, I inadvertantly left a can of yellow spray paint sitting on top of the washer {you know where I'm headed with this...remember the laundry room light debaucle?}.  When I went in the change the load out, I encountered my {semi} newly painted floors desecrated by the yellow paint can which had fallen from the washer and exploded all over the ground.  I was a little irritated {to say the least}.

I didn't take any before pictures because of the incident because, frankly, it's not an event I really cared to remember. But no worries, everything is good as new now.

Another project on the to-do list was to paint my kiddos's bathroom counter top.  For whatever reason, the little dears have been on a kick of drawing on things which should not be drawn upon.  The following of which include:  their bodies, other people's bodies, exterior brick, walls, doors, floors, clothes and now...countertops.

  Granted, the countertops were hideous to begin with, but adorning the hideousnous with even more hideousness did not negate any of the hideousness...only made it worse.
Chiseling off the tile and retiling or buying new countertops altogether wasn't really an option, so I resorted to my old friend...garage floor epoxy.  It's the same stuff I used on the tile floors in my laundry room.  I decided to conduct a little experiment to see if it would work equally as well on tile countertops as it has on my tile floors. 
So far it's looking pretty good...but then again it's only been three days.  I'll give it a little more time then update on how it has help up. 

Here's the before and after again, just in case you forget in the last three seconds how it looked...before and after.

And since I already had the paint out, I decided that I might as well freshen up the disgusting tile floors.  Just looking at them could easily bring on a severe case of pink eye.
I made it easy on myself this go around and just simply painted wide, horizontal stripes {rather than tape out a complicated/time intensive pattern}. 


I think it turned out great.  Now I don't have to worry about contracting a case of foot fungus if I accidentally step on the floors sans socks/shoes.

The next project just sorta happened by chance.  I came across the steal of the century when I found this gorgeous couch at the store for $279. 
My front room, up until now, has housed a piano, a shelf, two Guitar Hero guitars and accompanying drum set and drum pedal, an unused side table and a couple lamps, several awol Lego pieces and an army of dust bunnies...not the most aesthetically pleasing room in the house.  With my newfound purchase, I was inspired to create a living room worthy of actually "living" in, and not "storing" in.
I spent a little over $100 on accessories, about $50 on window coverings and draperies, and about $80 on frames for artwork.  All in all, I ended up spending just over $500 to completely transform this room.  


I think it has just the right amount of funkiness, freshness and funness, no? 

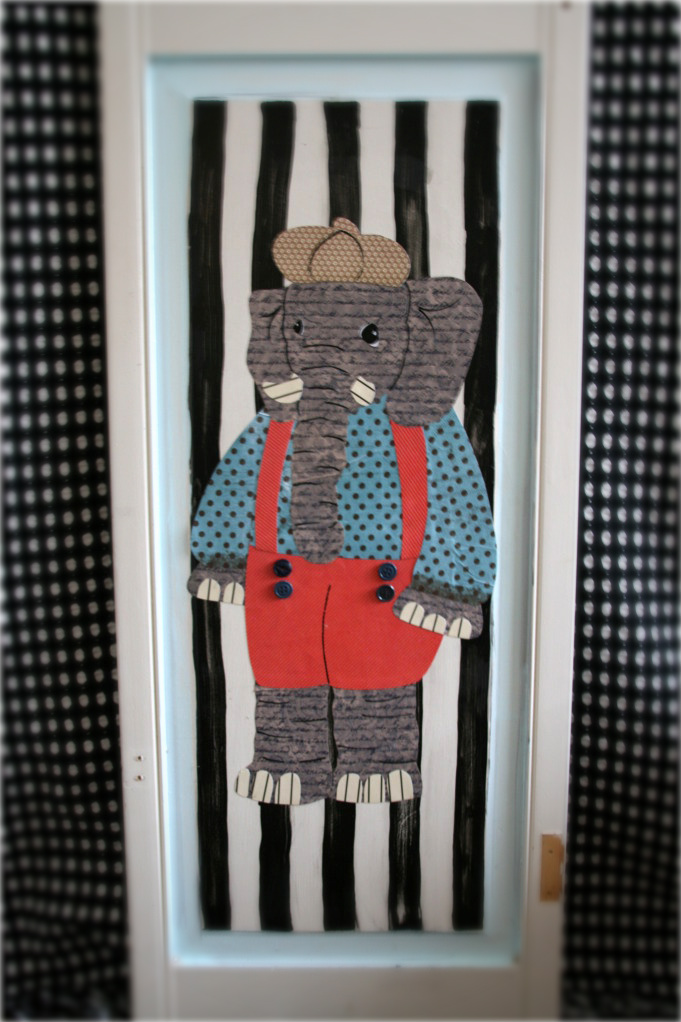
Can I also just add that the artwork itself cost me all of $2.  I found a really cool art book on drawing animals at the thrift store and simply ripped out some pages I thought were intersting.  The end result:  chic, custom artwork that looks pricy but in reality cost mere cents. 

You should totally try it.  Cause if one of your cute, little darlings happens to come across an awol marker and uses it to "enhance" your artwork, you won't have to "go to your happy place for three days" to cope with the incident.  You can just remind yourself, "hey, that picture only cost a quarter, no biggie".  And that, my dear friends, is priceless.

I don't usually close my posts with a question, but today I'm feeling daring.  Do you ever feel like all of your free time is spent touching up/re-doing projects you've already done?  Or is it just me and my gaggle of crazies.  I certainly hope not.  Til next time...


Wednesday, August 31, 2011

The Prodigal Daughter Returns

Ahh, my peepsies. I'm back...returning to the blogging fold as it were.

The summer off was wonderful. Surprisingly, I was a little saddened to send my kiddos off to the babysitters, err, I mean school. I became quite accustomed to yelling at them daily and watching them destroy my once tidy house. No really, I kid...kinda. But I will miss late nights watching movies and going out for sno cones and sleeping in until ten.


I didn't get nearly as much done on the house as I would have liked, but that's okay. I return to you a new woman, with renewed vigour. I am excited to get going on some awesome projects.


Here's a little sneak peak at a few things I'm working on right now:


The nursery:


You may recall that I just redid the nursery not too long ago. And at the time, anything would have been improvement from this {cue clown music now}


Seriously, what was I thinking...I blame it on pregnancy brain.

So, I transformed it into this.


Then suddenly, for whatever reason the room just stopped working for me. Methinks it may have had something to do with fact that there was a lot going on, without a really defined theme or idea to back it up.

Third times a charm, right? Here's where we are at today?


Okay, now this works for me. The kiddos' Very Hungry Caterpillar book inspired the color palette and theme for the room and also served as artwork. I think the room has just the right amount of whimsy and youthfulness, while still maintaining an element of sophistication.


While I personally prefer working with a "theme" or "idea" in a room, the key is not to go overboard. So, these fun, felt pillows


will be the only "themey" element in the room. I made these babies for about fifty cents a piece. I already had the black and white striped pillows. My only expense was the dollar I spent in supplies {4-5 pieces of felt} and an hour of my time. I think they turned out pretty, darn cute and the kiddos think they are pretty cool too.

I wanted to personalize each space further, so I made some fun, button monogram artwork.


They are not overtly themey, but still work in the room, one because they follow the color scheme, and two because they are letters and the theme is based around a book and reading...or at least that's how I justify it. These precious' ran me just under three dollars a piece. I purchased an assortment of buttons for six bucks at Wally's {Walmart} and repurposed some old picture frames I already had on hand. They are simple and sophisticated and add a nice pop of color to the wall.


There are still some obvious loose ends that need tying. I need to paint.


...and perhaps add some b&b {board and batten}, and frame out the window {a little skill I picked up this summer...more on that to come}.


And I would like to change out the light fixture to something like this.


Pretty soon my nursery will be complete...then what will I do? Ah well, there are plenty of other projects on the list. Besides, this room has been in the "metamorphing" stage long enough. It's time for it to fly on it's own.


Linking to:

Transformation Thursday


bluecricketdesign.net


Friday, April 29, 2011

Custom Artwork for the {His & Her} Nursery

I've been back from vacation for a few days now, but didn't want to post anything until I actually had something to post about.


I suppose I could have shared some "highlights" from the vacation, but I wanted to wait until I saw my therapist first. Just kidding, I don't have a therapist, but I should probably find one...and the kids and Studly too, after our week long debaucle. Perhaps I'll post about it a little later.

Til then, let's discuss artwork. I've spent most of the week working on some custom artwork for the nursery. Here's a peek.


The bedding in the room is from IKEA and has these fun, whimsical animals on them, so I decided to pull from that. With a {slightly creepy} zebra head already adorning the space it seemed only fitting to incorporate an animal theme, no?


I am a big fan of vintage storybook illustrations and so I tried to also incorporate a slightly vintage feel to the characters.


This is Frog.


I think he may be my favorite. I love his little bowtie and ridiculously, long legs.


I ended up using the panels from some old bifold doors as my canvas. Why? Cause they were available {just laying in the garage} which also meant they were free!


I used to be a big time scrapbooker, so I decided to create the artwork using a combination of paint and paper. I love incorporating depth and texture by layering patterned or textured paper rather than plain, solid colored paper. I also fashioned a 3-D bowtie out of paper just to add another element of interest {we'll see how long it actually stays on him}.


This is Bear. I made her a princess...obviously because my little darling is one...demanding and bossy.


This is Cow.


And finally, this is Elephant.


Check out those cankles!


The best part about his project, aside from finally having some artwork, was the price. I got the bulk of the paper for 25 cents a piece at Joann's. I used 3-4 pieces of paper per panel. Which means that I only ended up spending $4-5 on the entire project.

What have we learned from all of this? Utilize what you have lying around the house {left over paint, scrapbooking paper, scrap board etc} before running out and buying something. Not only is custom art one-of-a-kind, it's more sentimental and as shown here can be super cheap.

I have a decorative molding treatment I wanna try on the wall before I can hang them up...along with a few other projects. So, stay tuned for the wild {animal kingdom} reveal.