Saturday, June 30, 2012

{super} easy primitive planters

Okay, this diy project is so easy even a kid could do it.  No seriously, my thirteen year old son made some of these for me...and I absolutely fell in love with them.  They are rustic, they are charming, they are versatile, they are...Primitive Wood Planters.

I call them {primitive planters} because they are so crude and imperfect...sorta like something you'd expect to see from ancient nomadic peoples who had nothing but rocks and sticks to build things with.

All you need for this project is some lumber{I/my son used some old, reclaimed wood from our deck} and wood glue.
Start by determining how big you want your planter to be.  Mine measured approximately 12 inches by 6 inches.

I started by cutting a 12 inch piece of wood for my base.

Then I measured the width of the end of my base, and cut two end pieces to fit and glued them on.


Next, I measured the length of the base piece, plus the two ends and cut two more pieces for the sides and glued them on.


Just let the box dry...and VOILA!
Your very own, hand{glued}made primitive wood planter.  I actually prefer the simplicity and elegance of the old, weathered wood.

But, you could embellish the planters by painting numbers or words on the side as shown in the pictures below.

 {source}
You could fill them up with various plants or flowers for a rustic and attractive centerpiece for the kitchen table or island
 

they are the perfect accent piece for a coffee table
{source}
and also make very attractive wall storage/art.
They would also be the perfect containers for rolled up towels in a bathroom, or for organizing soap and other cleaning necessities in the laundry room.

The possibilites are endless with these easy to make planters.  They are the perfect addition in any room or for any thing {plants, plates or whatever else you might have lying around.} 
To quote M.Stew's famous phrase...{primitive} wood planters, "they're a good thing!"


Friday, June 29, 2012

and the bathroom saga continues...

Sorry, it has been a while since I posted last.  I really wish I could say that it was because I'd been relaxing pool side. 
But, in fact, I've been busy preparing my basement for it's new purpose...a preschool.  Ya, no, you read right.  A preschool...as in a place where little people go to nourish their ever expanding minds.  My husband thinks I'm a total wacko.  I guess it's just one more item to check off my "what the {insert profanity here} was I thinking" list.
Truth be told, I quite enjoy the company of children.  They keep a person young.  I am excited to see how this little adventure plays out.  I'll be sure to post pics of the newly transitioned basement once it is complete.

In other news, the bathroom saga continues.  I was finally able to find an {available} claw foot tub.  It has a pretty interesting history.  It comes from an old hotel in downtown SLC...actually, the building housed single occupancy rooms where tenants shared bathrooms.  The building is being torn down and the construction company working the job was able to salvage about 15 claw foot tubs.  The tubs are all around 80-100 years old...and they look every bit their age.  But, that's what I love about used/antique pieces.  They have character. 
Anywho, Studs and I took a trip downtown to look at it.  It was love at first sight for me, but Studs had a weird constipated look on his face the whole time, which I interpreted to mean that he wasn't feeling it. 
So, the debate continues on.  We definately have our work cut out for us.  Studly and I have totally different design preferences.

He's always favored modern-minimalist design: 

While I relate more to cozy-traditional design:

{source-unknown}


Whatever we decide, it better be quick.  I'm about one week away from full-on panic attack mode, due to the moldy, deconstructed state of my bathroom.  Fingers crossed Studly and I can come to an agreement where both of our voices can be heard...soon, very soon.


Tuesday, June 19, 2012

Not a lot to report, but...

Howdy peeps!  I hope you are all enjoying the summer.  I can't tell ya how much I have enjoyed not having to get up every morning at 6:30.  It's gonna be a big adjustment come fall.

Anywho, just wanted to tell you that I have another contributers post up over at lovestitched for those of you who are interested.

It's a super easy tutorial on how to make {primitive} wood planters. 
So, if you wanna continue to be the coolest mom at playgroup, you better hurry on over and check it out.

In other news, my "accidental skylight" is now once again a ceiling.  Yay!  There's something uber creepy about having an exposed attic...too many horror flicks I guess.  Now, just to paint and it'll be good as new.

In other, other news, I've been doing my darndest to procure a claw foot tub for the {hopefully}new bathroom renovation.  The seller I've been communicating with has been a bit of a flake, so I may have to turn my search elsewhere.  Wish me luck.  I'm highly motivated to track one down, what with the possibilty of bleeding lungs and all...not to mention, that my weekly date with a bubbly hot bath and gossipy magazine has been put on hold for the time being, and I'm not willing to go without for much longer.  As I said, wish me luck.


Friday, June 15, 2012

War's A Waging On The Homefront

Battle of the Attic Leak

The battle began last weekend, when Studs and I stumbled upon this horrific sight in our bedroom.
No one expects to walk into their sanctuary and find a gaping hole in the ceiling and drywall lying in a heap on the floor...btw, the insulation from the attic made for a very fun clean up.

Studly used some of the detective skills he picked up watching Castle and got to work searching for the culprit behind the gruesome murder of our ceiling.  Turns out is was but a little leak in one of the cooling unit ducts.  {sometimes it is the smallest things that cause the biggest problems...don't believe me, just ask someone with a tape worm.}

We got the leak patched up and are now praying that another one doesn't pop up somewhere else down the line.  This is already the second or third drywall massacre due to a leak.  When I {lovingly} refer to the house as a money pit, now you'll know that I'm not exaggerating.  I guess the one nice thing to come out of this whole mess is the possiblity of a new wall color.  The glass is always half full peeps, always half full.

Battle of the Mold

Imagine the horror when Studly started de-tiling the bath tub surround and came across yet another horrific sight.

Is that black mold?  I dunno know for sure  The sight of it makes my throat burn and my lungs hurt regardless. 

Looks like the master bath revamp I thought would take some convincing is a GO for sure now.
There's nothing more motivating than the possiblility of lifelong health issues...bleeding lungs, blindness, brain damage...DEATH, to get a job done.

Remember how I said the glass is always half full.  It's all about attitude baby.

Looks like I may have a date with a claw foot tub sooner than I thought.

The battles may have been lost, but the war has been won this time, methinks.  Boo-ya!!!


Sunday, June 10, 2012

Holy Crapola!

Quick, someone hand me a diaper cause I'm about to pee my pants.

Today, in a rare moment of quietude, I hopped onto a local classifieds website and came across this:
A black claw foot tub.

Aren't the brass claw feet killer?  I am freaking out, I'm so excited.  The master bath has not had one improvement made in it since we into the money pit three and half years ago.  If I can talk Studly into taking a look at this delicious piece of gorgeousness, maybe it will motivate us to get crackin' on the bathroom.

As always, money will be a major issue in this potential reno {especially since we came home yesterday to a gaping hole the master bedroom ceiling...blast you leaky swamp cooler}, but the tub I found is only $175, which all things considered, is not much of an investment.  Fingers crossed I'll be bringing my baby home soon.

Here are some inspiration pictures to get you drooling.

I know the tub isn't black, but couldn't you spend hours in this room soaking in the tub? Ah, calgon take me away.


Saturday, June 9, 2012

Contact Paper Chronicles-Part 2

If you asked me how I felt about contact paper fifteen years ago I would have said, "that stuff is hideous.  Not just hideous, but HID.E.OUS!!!"

 I'm sure every one of us has had an ill fated run in with the stuff at one time or another.  I'm taken back to the first apartment Studly and I shared.  It was 1996, we were young and newly married and sporting ridiculously, embarrasing hair-do's {I had a shag...or the Monica as it were, and he, the short lived Caeser}.  We were so excited to start playing house together.  The apartment was perfect...aside from the nightly cockroach rave and the fact that every drawer in the place was lined with peeling, dated, disgusting contact paper.  Good times, good times. 

It took awhile for me to acknowledge the existance of contact paper again.  I mean, I would occasionally bump into it at the Home Depot or Walmart, but thought nothing of it.  Eventually, we made ammends and I started using it for homemade stensils and what not.  We were on good terms but nothing serious.  But then one day I had a vision...a vision of a gorgeous lamp with a wood veneer drum shade.  I didn't want to spend a ton of money on wood veneer, so I used the cheapest alternative I could find...wood grain contact paper.  After my $3 Lamp Shade Revamp project, I realized that this stuff {I once considered an interior design faux pas} could have potential when used in the right way.  So, I took that ball and ran with it...down the hall and to my daughter Quinn's bedroom.

Quinn's room had been lacking something for awhile, so I started toying around with the idea of putting in a wood accent wall.  I kept putting it off because I wasn't sure if I wanted to commit to something that permanent, especially when it required a moderate amount of labor.  Then I remembered that I had an extra role of faux wood contact paper lying around, so I decided to conduct a little experiment.  I decided to try making a focal wall using contact paper instead of real wood.  I was a little skeptical at first...worried that rather than looking like a tasteful, wood accent wall, it would look like, well, a wall with a bunch of contact paper on it.  

But I persisted, and once I had filled up a large portion of the wall, I realized that it didn't look half bad.  In fact, I was really starting to dig it.  It gave the room sort of a cool, reto vibe.

Once I brought in all of the bedding and accessories it started coming together and made sense.
It took about two and half roles to fill the entire wall...which translates to just under $20.  I was able to complete the project in four or five hours...most of which was spent cutting the contact paper into squares.  The application process went by fairly quickly.  Ah, I'm such a sucker for a quick transformation. 

It definately adds and element of warmth and interest to the room, which it was lacking before.
And the best part about it, I can remove it all in a matter of minutes if I decide to.


So, I quess I'll let you be the judge.  Contact paper:  still an interior design faux pas, or an old friend has simply gotten a bad "wrap"?


Thursday, June 7, 2012

A Big Time Shopping Score and A Focal Wall

So, momma hit the jackpot big time today.  I wasn't even shopping really, I was just returning some items and decided to take a quick drive by of the home goods at TJ Maxx before heading up to the cashier.  And wouldn't you know it was my lucky day...there they were basking in the glow of artificial light.  It was truly divine.
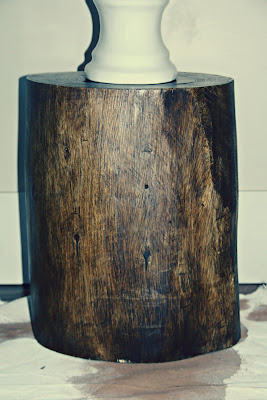
A tree stump end table and a couple of natural fiber lamps. 

I've been eyeballing an tree stump table similar to this one at West Elm for months.  I just couldn't bring myself to spend the $200.  This little beauty is a darker wood {I prefer lighter} but it was half the price {and after returns it ended up being more like a quarter of the price} and I just couldn't pass up a deal like that.  So I nabbed her.
 

Then when I turned the corner to head towards the clearance section, I saw two of these precious'.  I wasn't in the market for new lamps, but these beauties were on sale for $15...I swear on the gorgeous head of David Beckham I'm telling the truth.  Fifteen dollars, can you believe it?  You can't even by a lamp shade for that.  So, of course I grabbed them two.  I'm feeling like a revamp of the front room might be in order now.  {Studly will be happy to hear that.}


So far, the summer is off to a great start.  Although, I better pace the shopping adventures or Studly will surely lock me away til summer's over.

In other news, I completed one small project on my to-do list- a "wood" focal wall in my daughter Quinn's bedroom.  I'm not gonna say much about for now.  I'll fill you in on it once the room is entirely done.  But here's a little sneaky peeky til then.
{sorry for the grainy pic, it was taken on my iphone}


Tuesday, June 5, 2012

This n That


I meant to get a post up last week but just didn't end up having the time.

The fam and I headed south to *VEGAS BABY*  last Friday to go watch my gorgeous niece participate in the Miss USA pageant. {Ya, this woman and I share DNA...cah-ray-zee!!! I know}.
Photo: Miss USA 2012

Miss Utah USA 2012, Kendyl Carol Bell, competes in her choice evening gown during the 2012 Miss USA Presentation Show on Wednesday,May 30 from the Planet Hollywood Resort and Casino Theatre for the Performing Arts in Las Vegas, Nevada. The 2012 MISS USA® Pageant will air LIVE on NBC June 3 at 9:00 p.m. ET from the Theatre for Performing Arts in Las Vegas
HO/Miss Universe Organization L.P., LLLP. PATRICK PRATHER
Regardless of the outcome, she is still {and will always be} the winner in our eyes.  We love you Ken!!!  You da bomb!

In other news, when I finally got home last night, I was greeted by yet more gorgeousness...my new outdoor rug.

Outdoor Area Rug or Kitchen Mat 6 x 9 Turkish Aqua Patio Indoor Outdoor Rugs Reversible & Waterproof
 
Remember her.  She's beautiful and "green"- made 100% out of recyled water bottles.
I can't wait to see how she looks out on the deck in her new home.

And finally, the kiddos will be out of school tomorrow.  I am really hoping to be able to finish up some projects I've started.  I'll be sure to post all about them.

Phew, it's finally starting to feel like summer.  Let the {diy}games begin.