Showing posts with label anthropologie. Show all posts

Sunday, February 10, 2013

Hand Painted {Anthro} Inspired Lamp Shade

I recently introduced you to my wonderful, new friends Lucy and Ethel.  Aren't they cute and vintage-y? 

I decided I should dress them up with a new, fabulous shade...like this one from Anthropologie pictured below {$118-128}.
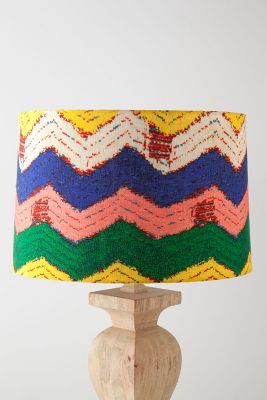
Chevron-Banded Drum Shades
I love how bright and colorful it is...a modern take on the chevron stripe.

I'm in the process of redoing my master bedroom and wanted to add some brights pops of color.  I thought this shade would be perfect.  But since I am in no position to run out and drop $250 on two lamp shades, I had to improvise and try my hand at making my own. 

 I already some white lamp shades just waiting for a makeover.

I started by freehanding zig zag stripes all around the curcumference of the shade.

I used a water soluable ink pen to do this.
{You can erase the ink with water, or in a few days the ink will evaporate and disappear.  They are about $3 and can be purchased at any craft store.}

Once I had my lines drawn out, I went to town painting all of the stripes {I used regular old acrylic craft paint and a stiff bristled brush to do this}.

I embellished the stripes further by adding "dots" using a grey and dark pink marker.
I didn't take a picture of this step because it was 2:30 am and I was delusional.  But, you can see what I mean in the picture below.
Finally, I added the small patches by painting little squares all over the lamp shade and embellished them by adding "dots" using the wrong end of a paintbrush and craft paint.

And voila...done.

It's not a perfect or exact replica of the original.  I personalized the colors I used for the stripes.  My only complaint is that I wish I could have captured the "watercolorness" of the Anthro shade.  But it still maintains the vibrance and funk of the original...and it totally shows off Lucy's curvalicious shape, no?  Even better, it only cost me about $15 to complete.  And for that, I like it just fine.
In total, I ended up spending {$3.50 on paint, $5 on new markers cause my kids had dried all of ours out, $4 on new paint brushes and $3 on the water soluable ink pen.  That works out to a grand total of $15.50}.


Friday, April 20, 2012

Faux zinc/industrial metal letters-Tutorial

Anybody remember seeing these beauties at Anthropolgie awhile back?


I really like the urban punch these industrial letters give. They are super versatile and look great in any room and in any decor.


As I was nearing completion on my latest project, my laundry/mud room revamp...I thought some of these lovelies would be the perfect accessory for personalizing some hooks I hung.


Always the sucker for knocking off anything I think is over priced, I set out to recreate these preciouses for as little as possible.


I started out with a regular, old paper mache letter {or number or whatever tickles your fancy}. You can get them at any craft store {$2-4.50, depending on what size you choose}.


I grabbed some black and some metallic silver craft paint. {$2-3 each}


and some silver brads {$3 for 50}


Bam! That's all you need to create some industrial chic goodness.


To begin, paint the letter {or number} black


After it is dry, lightly brush over it with the metallic paint.

You want to take care not to put the paint on too thickly. The goal is to allow some of the black base coat to show through.

After this coat of paint is dry, apply one more coat of metallic paint. Again, brushing very lightly. Most of the black should be covered up with the silver paint at this point. But, you should still be able to see some of the black peeking through- giving the letter more depth and the zinc look we are going for.


Now, you could stop here and call it good, or you could add a little industrial bling by applying strategically placed silver brads all over the letter.


Poke a little pilot hole with a sharp utensil of your choosing...I used a little paring knife.


Once you have the hole made, add a little hot glue to the prongs of your brad and insert into the hole.


{I brushed over all of the brads with some left over paint to tone down the shine and help them blend in with the letter more...not necessary, but I think it looks better personally}.


And voila. Paper mache letters that look just like industrial metal letters.


I ended up spending about $30 for five, 12 inch letters. The zinc letters at Anthropologie, were smaller and sold for around $18 each. That's a savings of almost $70. Boo-ya!!!


{Also, my little tip for hanging the dears...use adhesive velcro cut into little squares on the back. The letters will stay nice and secure on the wall. This also makes it easy to take down and put the letters back up should you ever need to.}


Monday, May 23, 2011

Mock of Monday {Antiqued Mirror}

Have any of you happened to come across this mirror collage at Anthropologie?

I am in love with the antiqued look of the mirrors.


I have wanted to try to recreate them for awhile, but I've been too scared to try. The process involves the use of a couple of highly toxic chemicals and to be perfectly honest that really freaks me out.


Today, I finally got up the nerve and went out and bought all of the supplies:


Paint thinner


Muriatic Acid


Chemical Resistant Gloves


I recently purchased a set of of oval mirrors and thought they would be the perfect guinea pigs to test it out on.


Ready to get your Bill Nye on? Here we go.


First, remove the mirror from the frame and place on a thick layer of newspaper.


Put on some glasses and gloves and say a little prayer. No seriously. You don't want to look like this when you're done.


Then pour some of the thinner into a disposable cup


and apply liberally to the back of the mirror with an old brush. The paint thinner will soften the protective coating on the back of the mirror allowing you to scrape it off.


Let it sit for however long the instructions recommend you leave it on for. {the stuff I used recommended 15 minutes}.
Then, scrape away the coating with a spackle blade. I don't know if I just had stubborn mirrors or what, but I had to apply thinner twice because not all of the coating came off the first time. I'm not gonna lie, it took a little elbow grease but it eventually came off.


After all of the coating has been removed, wipe the mirror backs off with a wet paper towels, or rinse with the hose. I opted for the hose.


Now you need to prepare the muriatic acid. I purchased a small plastic funnel at Walmart for .69 cents which I used to pour the acid into a squirt bottle.
You will use it to lightly spray the acid around the edges of the mirror. The aid works really fast so just be ready with the hose in hand to rinse the mirrors off. It will only take about a minute.
Gently dab off all of the moisture on the mirror and lay face down to dry.
Once dry, apply a coat of gold spray paint to the back and allow to dry some more.


Then place the mirror back into the frame and...VOILA! An awesome antiqued mirror.


The cost of the supplies is a little investment: $10 for muriatic acid, $8 for paint thinner and $6 for gloves for a grand total of $24. But, I have enough supplies left over for several other mirrors.


Aknowledgements to Mandi over at Vintage Revivals for having the kahuna's to antique a mirror first. You go gurl!


Monday, May 9, 2011

Mock Off Monday {Shower Curtain Edition}

Before I begin, I just want to say that today's project is not 100 percent knock off. Now don't go gettin' your panties in a wad. I said it wasn't 100 percent knock off, but it is about 85 percent knock off. It's merely a simplified version. But if it makes you any happier, I'll explain to you how to create both versions. Sound okay?


Here is what inspired my project.

Isn't she gorgeous? I love the cascade of ruffles.

Now, here's my version.


I know, I know, not quite as luscious as the Anthro version. But I still love it.
I kept my color scheme simple...solid white {muslin}. I made my shower curtain for my {beachy chic} bathroom so I wanted it to feel really light and ethereal.


I also wanted a slightly tattered look, so I didn't even bother hemming the edges. I ripped all of my muslin rather than cutting it, that way I could have raw, frayed edges. Not only do I like the way it looks, but it cut off a lot of sewing time.


If you are not into the frayed look you will have to hem the the two side edges and bottom edge of all your strips. {note, you will need to hem all four edges on your first layer as the top hem will be visible. The rest of the layers will overlap so it isn't necessary to hem the top edges of them...unless you have OCD or just really, really want to.

Here are the supplies needed:

*An old shower curtain {preferably white, or a lighter color/fabric cut and sew together to form a 72in. x72 in. square. I used a pair of old curtain sheers {they were $3.99 at Ross, just in case you don't have anything on hand to use} that I cut to 36 1/4 in. and sewed together {36 1/4 plus 36 1/4 equals 72 1/2 in.}. I allowed for a 1/2 in. seam allowance. If you are new to sewing, that simply means that I stitched 1/2 in. in from the edge of the fabric.


*10 strips of fabric cut down to 9 in. x 72 in. {depending on the width of the fabric you use, you will need anywhere from 4-6 yards of fabric-possibly double or triple that if you decided to ruffle your layers. Whether you prefer the fullness of ruffles or the simplicity of layers you will need the same number of fabric strips. However, the ruffled version will require more fabric for each strip. You will have to gather each layer before stitching them on. I guesstimate that you will need double or triple the amount of fabric for the ruffled version, but that could vary depending on how thickly you gather the fabric. To gather fabric you simply cut your fabric strips to right width {9in} then run them through a sewing machine with a gathereing foot. You may have to sew 2 or 3 strips together for them to be the desired width {72 in.}. It's a bit of trial and error. The other option is to loosen the tension and lengthen the stitch on the sewing machine and then gather the fabric by hand. I actually prefer this method because I can control how thick the gather is. Gathering can be a pretty time consuming process. It isn't necessarily hard, it just takes a lot of patience...obviously I don't possess that quality which is why I opted for my lazy, err simplified, version instead.


*12 strips of fabric cut to 2 in. x 7 in. {These will be used to make the tabs at the top. You could also use ribbon}


Once you have all of your pieces prepped...the square piece is ready, all of the strips are hemmed and ruffled or ripped, and your tabs are cut, you can start assembling.

Lay your square piece out. Then fold your tabs in half and place 1/2 down from the top edge of the square piece, spacing them out about 6 inches. Then, match your first layer to the top of the square piece and pin the three layers together at each tab. Now you are ready to stitch along the top...about 1/4 in. in from the edge.


For the second {and remaining layers} measure up 2 inches from the bottom of the first layer and mark. This is where you will sew on the next layer. Continue measing up two inches from the previous layer and attach new layer. You will end up with overlapping layers.


You can see the 2 inch overlap here if you look closely.


Repeat this process until all ten layers are sewn on. As you get further into the project you will be managing a lot of fabric as you sew. Just take your time and stitch slowly. It took a good hour or two to sew on all of my strips. This process will be longer if you are sewing on ruffles simply due to the massive bulk you will be handling. But, it will be well worth all the effort in the end.

Eventually you will end up with a little something like this


Or like this if you went with the ruffles.

Anthro's Flamenco Shower Curtain retails for $118. I ended up spending about $15 to make my simplified version, which means that for $30-$45 {ish} you should be able to make a ruffled version. I always love it when I can save myself a couple of bucks...or in this case, over $100.