Tuesday, May 29, 2012

DIY Metal Decorative Spheres

For any of you who missed my contributer's post over at Lovestitched last week, here it is.  I bring you:  Decorative Spheres...heavy metal edition...rock on peeps, rock on.

Do you ever get in one of those moods where you wanna start a project, but not one that will take days...weeks...months to complete- just something easy, cheap, awesome and super quick.

Well then, I have just the project for you.

We've all seen 'em.  In fact, some of you probably have some in your home.
They are decorative spheres. 

westelm.com

Decorative spheres are totally the bomb.  Just think of all the awesome things that are round...the earth...the sun...gumballs. 

Spheres provide great filler for bookshelves and containers, and are the perfect accessory for tables, countertops or any empty space really.  Spheres help add visual interest to any decor and can also add an element of softeness to a space.

The metal spheres I'm going to show you how to make would also be a great addition to an outside garden or sitting area.  Just think of the lovely, rusted patina they would develop over time.

To begin, you need to gather your supplies:

Screws and bolts {8 of each are required for one sphere.  A package like the one pictured above costs about $.98}

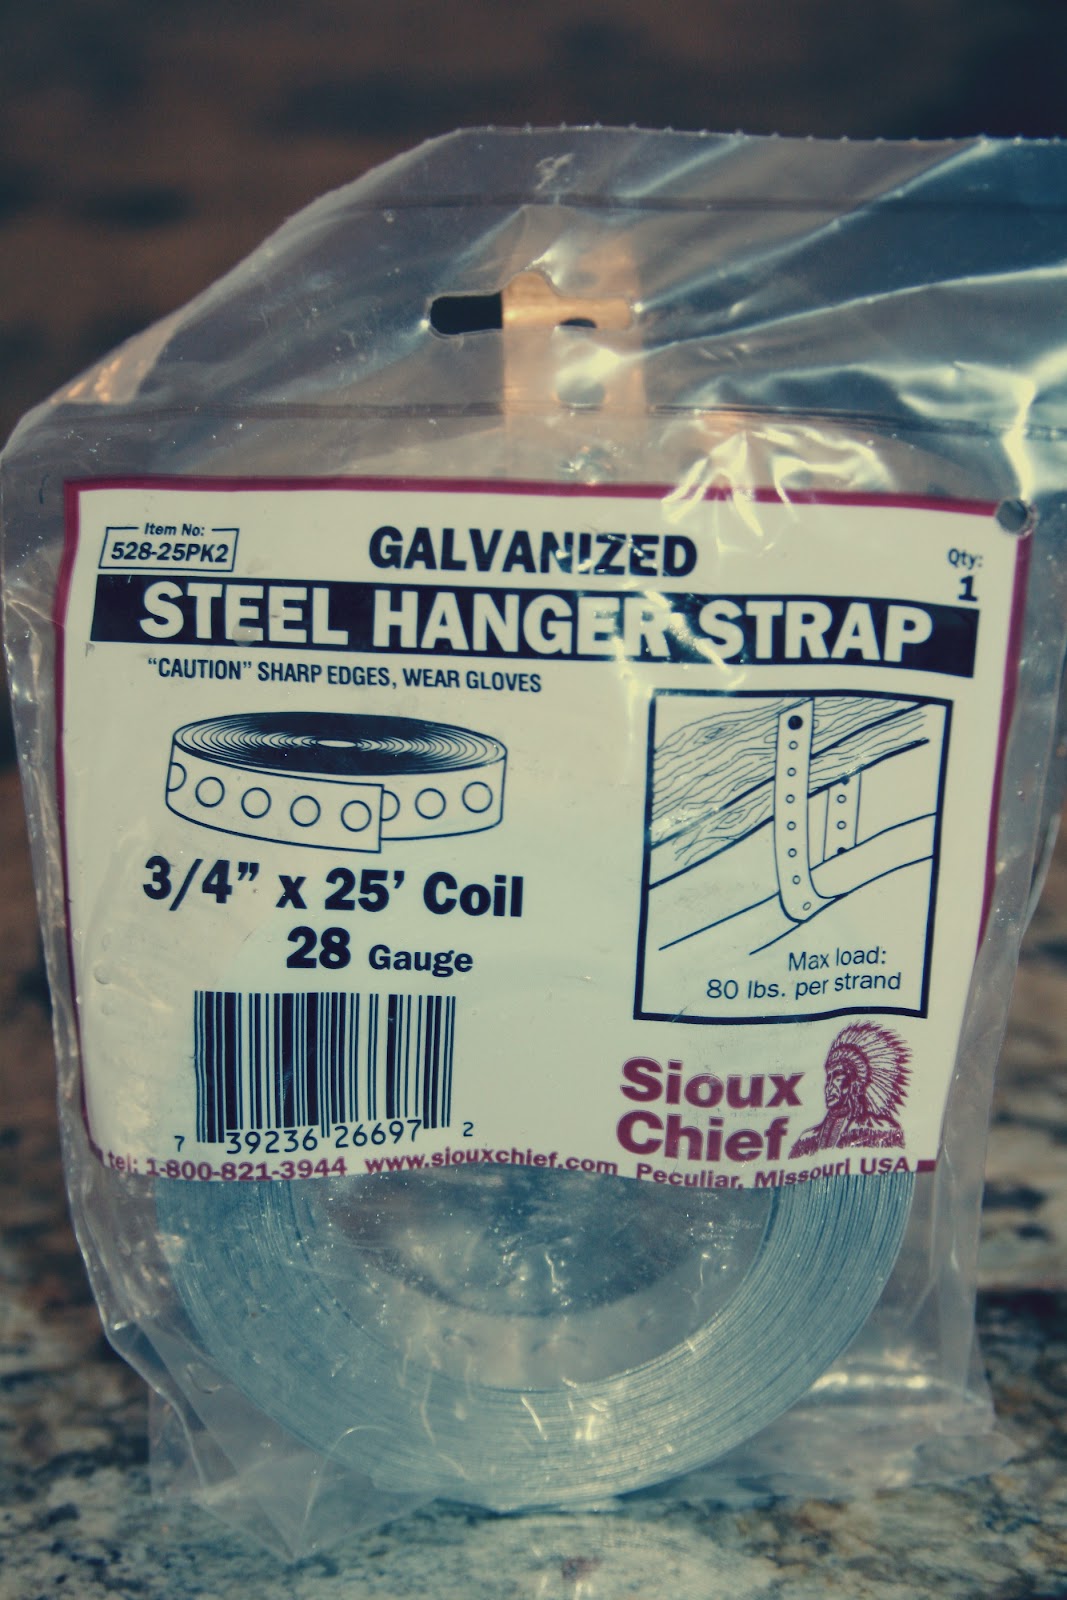
Metal strapping {$5- available at any home improvement store}

A round container for measuring your metal strapping {in this case a ginormous jar of peanut butter, cause that's how we roll}.

 Start by measuring your strapping.  Do this by wrapping it around your circular container.
Do this four times.


Now you can begin assembling your sphere
Then add a second hoop and secure the top and bottom with a screw and nut.

Then add a third hoop and secure it at the top and bottom as well.
Add your fourth and final hoop around the circumference of your sphere.  This will stabilize and support your sphere.  Be sure to add a screw and nut every where the the strapping intersects itself.


And voila!  That's it, you're done.  This project is super quick, super easy and super cheap. 

I love the cool, industrial look of these orbs.  Somehow they also managed to stay classy and sophisticated. The one's I made ended up on my bookshelf.


Look how awesome they could be with a rusted finish.
Iron Sphere - Rusted in Garden Ornaments eclectic outdoor decor
Once upon a time you could buy metal paint and rusting meduim.  I want to try and track some down so that I can make my orbs look all old and rusty.  They are fine they way they are, but I think a little rust might make them even that much better. 


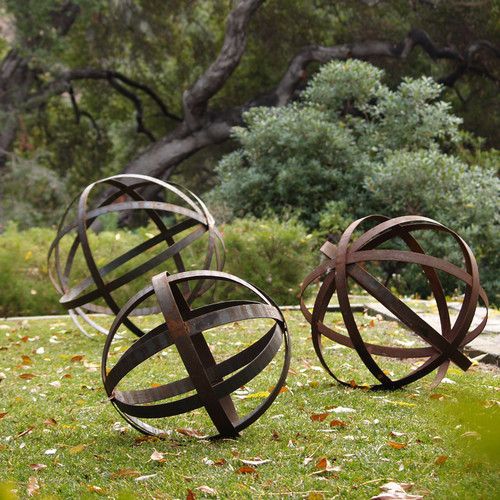
These powdered coated spheres are a fun variation.  Something like this would look fabulous on a deck or patio table.


Now I am thinking of making one ginormous orb and turning it into a ceiling light.  Something along the lines of this:

I really love the look of wood, so naturally I had to try out a wooden version too.  I made these out of wooden embroidery hoops and thumb tacks.

These spheres are 8, 9 and 12 inches in diameter.

When it was all said and done, I ended up spending about $2 for each metal sphere.  I was able to make 3, 4in. diameter spheres and 1, 7in. diameter sphere out of one $5 package of metal strapping.  The wooden spheres cost about $3 a piece {each sphere took two embroidery hoops at $1.50  each}.  I'm not sure how much something like these would cost retail, but I'm pretty sure you couldn't get them for $2 or $3.   


Tuesday, May 22, 2012

{$100} DIY Wood Plank Table

The warmer temperatures are definately affecting me.  First it was the landscaping.  And now I have found myself all gung-ho trying to get our deck summer ready.

I haven't had much luck by way of outdoor furniture sets.  Don't get me wrong, the prefab sets are great, but I have yet to come across one that I really care for or that will fit my entire family.

I finally had enough of searching and decided to try my hand at making my own.  Sca.ry.!!!

I knew I wanted the table to be wood.  And with my limited {nonexistant really} carpenty skills it had to be something simple.  I settled on a basic plank top table.  Picture...picnic table but with more style.

I started out with two, wooden sawhorses.
These are readily available at most home improvement stores.

I cut down a 1x8x8 in to two, 48 inch pieces...or two, 1x8x4's.

I used these two pieces to extend the width of the sawhorse tops so that my table could be wider.

After I attached the boards to the sawhorse tops, I started attaching the planks for the table top. 

I started with the middle one first, then worked outwards. 
{It might be worth noting that I dry fit all of my planks together before screwing them down.  Most boards, let me rephrase, no boards aren't perfectly straight.  So, it takes a little finagling to get them all to fit just right...sort of like one ginormous puzzle.  It is also important to point out that even though the store says the boards are eight inches wide, they are really more like seven- something to think about when you are deciding what size width you want your table and also when cutting down your boards for the sawhorse tops...take it from me I learned the hard way.}

I ended up using eight planks of wood total...one that I cut in two, and the other seven for the table top.


I spent just under $40 for the two sawhorses {$18.50 each} and about $55 for eight wood planks {$6.69 each.}

For a much needed pop of color I bought this awesome outdoor rug. 
I love it!  I love the colors, I love the pattern and I love that it is made out of recycled water bottles...just doin' my part to save the earth...stylishly, of course.

I cannot begin to tell you how excited I am to finally have an outside gathering spot for the family.  Last night, after I finished screwing on the last board, all the kiddies came outside to sit down and test the table out.  We ended up eating our dinner around the table and chatted and laughed til it started getting dark.  I am hopeful this table new spot will provide the setting for many more lighthearted family dinners and late night family conversations. 

Awesome, wood plank dining table...$95.
Making memories with the fam around said dinner table...priceless.


Industrial Metal Spheres Tutorial At Lovestitched...and a super, secret, soon-to-be revealed project.

All righty, friends.  I have another tutorial up over at Lovestitched.

It is a super quick, super easy, super cheap and super awesome "how-to" for making decorative, metal spheres like these.


These lovelies are perfect for any space devoid of awesomeness {either inside or outside}, and only cost a few dollars to make.  So, head on over to lovestitched and learn how to make some so you can be the cool mom on the block.

In other news, I've been working on a little something something.  I am hoping to have it completed by days end, so check back later to see.

I'll give you a little hint...it involves a couple of wooden saw horses, some wooden boards and very...very mediocre carpentry skills.  HOLLA!


Wednesday, May 16, 2012

Gearing up for summer!

Howdy, peepsies! 

The weather has finally decided to stop teasing us...at least I hope so.  It's been beautiful and warm for the last week or two now and I am feeling ready for summer more than ever.  

Isn't it strange how our mental health is affected by the changing of seasons.  I am so motivated to get going on my long list of "to do's" now that I know the snow is in hibernation mode.  I have some big plans, if only I could get Studly on board.  Poor guy!  He freezes in horror everytime he hears me say "hey, I just had a really awesome idea".  We'll see how it goes. 

One of the jobs at the top of my list was to get the front yard landscaped...finally.  So, for the last week or so, Studs and I have been out in the yard digging and planting and watering.  We have no idea what we are doing, but things are looking pretty good so far...the place may be a tangled, jungle mess in ten years, but I guess we will deal with that later.

We have a little spot reserved for a sitting area {on the right hand side behind the rocks} , so I've been "researching" bistro sets and the like.  West Elm never ceases to deliver.  I found this beautiful wood furniture set that I would love to have. 
The dining table and benches would be too big for the space out front, but they would be ideal for the back deck.

This little coffee table and a couple of chairs would be perfect for the space, though.
All of West Elm's outdoor furniture is currently on sale, but it is still a little spendy.  I'm at the crossroads of deciding if I should spend more and get what I love, or spend less and get something that I just like...like this cute, turquoise bistro set from Target.
 I really like the color...naturally, but I don't particularly care for the style.  But bare in mind that this three piece set is $74, while the West Elm coffee table and two chairs is $580.

There is always the option of compromising and buying something more afforadable with a similar look as the West Elm set.

Little, wooden bench
Pottery Barn-$249
Wooden Armchair
 
Ikea-$99

Adirondack Chair
 Cost Plus-$99

Coastal Inspired Adirondack Chair
Cost Plus-$129

My heart is still smitten by the West Elm furniture, but I'll mull it over for a bit and see if I still feel that way.  I guess it's nice to know there are so many options available.  Whatever I decide to do, I can hardly wait to go outside and sit and soak up the long awaited summer sun. 

Are you as ready for summer to begin as I am? 


Wednesday, May 9, 2012

Finding your personal {design} style.

I’ve been thinking a lot about the ins and outs of making a house reflect one’s personal style. I don’t know about you, but sometimes, well a lot of times, I find myself up against a {design} wall. I’m beginning to realize that this usually happens when I’m trying to force something that isn’t really me. This got me to do some deep, thinking? Who am I? What do I really like? And how can I transfer these discoveries into the design of my home. {Who knew interior design was so introspective?}.

Here’s a list of some thoughts and questions I recently asked myself. They helped give me perspective and narrowed down my design aesthetic, and I thought they might help you too.

1- What affect do you want your home to have?
It has been said that there is a definite link between color and emotion. This idea should definitely render some consideration, since the colors you choose to decorate with could quite literally affect your mood.

When I was young and energetic in my twenties, it was all about bright colors.
 I loved the color red…which is one of the most stimulating colors on the color wheel.
{freshhomeideas.com}

But now that I am old and in my thirties and life’s beginning to feel a little more hectic, I find myself favoring a more calm and relaxing atmosphere. Consequently, my color of choice nowadays is turquoise…along with a few other bluish hues.
{chicgeekdesings.com}

Interestingly enough, blue just happens to be one the more soothing colors on the color palette. Believe it or not, your surroundings and the colors within them, can have a profound effect on your emotions.
2- Consider your own personal style.
When designing a room, use your clothes closet to help give you some design direction.

Are you trendy…always wearing what’s new and fresh? Or are you more classic…still fashionable and put together, but with a more timeless style?

Do you wear lots of bright colors,
{housebeautiful.com}

or do you prefer more muted tones?
{freehouseinteriordesignideas.com}

Are you a little quirky {I always reference Zooey Deschanel on this one}
{comohodesign.com}

or do you prefer something more elegant and sophisticated?
{homedit.com}

What is your favorite color to wear? What color is most prevalent in your closet?

What is your outfit of choice? Is it something laid back and comfy {think slip-ons and jeans}
{southerliving.com}

 or do you prefer something a little more glamorous and glitzy {jewelry and heels}?
{lilyandrose.net}

These preferences can help you dictate what interior design colors, themes, vibes and aesthetics you will most likely prefer.

To put it into a practical setting, my very most favorite piece of jewelry is a long, chunky turquoise necklace that I wear with almost everything {my whole entire house is accented in turquoise…go figure}. But maybe for you it is your favorite pair of leopard print flats {consider animal print rugs or throw pillows in your home}
{enchanteddreamweddings.com}

or your favorite gold bangle {consider gold accessories such as lamps and picture frames}
{decorpad.com}

Whatever it is, figure out how you can translate it into your personal space so you can really make it yours.

 
3- What inspires you?
When you are at the store or surfing the net, what types of things seem to really speak to you?

Do bold, geometric patterns get you giddy,
{designshuffle.com}

 Or is it old, vintage items with stories to tell?
{homeklondike.com}

Are you moved by the clean, simple lines of modern design,
{mobfin.com}

or inspired by the rustic, earthiness of farmhouse style?
 {ehomee.com}
Are you inspired by nature, or by the hustle and bustle of city life?

Whatever it is, think about it and narrow it down.

What truly inspires you? Consider every aspect of your life: religion, hobbies, interests, family, traveling, etc., and find a way to incorporate it into your design. 

Another technique I’ve started using is to make a collection of rooms that I not only like, but absolutely love…rooms that I would consider my dream rooms {thanks to pinterest for making this a whole lot easier}. Take a moment to see what all of the rooms have in common. Odds are there will be some underlying thread tying them all together. It might be wall color, or the color palette as a whole. It might be the furniture or artwork, or even the overall style: modern, vintage, farmhouse, boho, etc. Once you’ve got it pinned down, you are well on your way to finding your own personal design style.
Do you have any suggestions to add, or thoughts on how you came about finding “your style”? Inquiring minds wanna know, so don’t be scared to share.