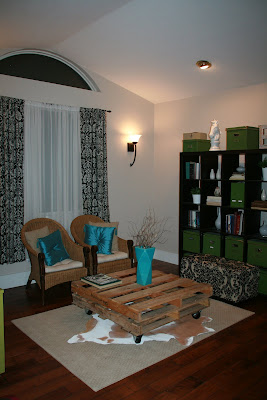
In case you never caught my cowhide rug tutorial over at lovestitched, here it is now for your viewing pleasure.
Lately, I've totally been crushing on cowhide rugs. For those of you who aren't quite sold on the whole animal hide rug notion, just get over it already and accept the fact that they are totally the bomb. These lovelies can add interest and sophistication to any room, not to mention, make you the talk of book club for days, weeks, months even...probably. If you don't believe me take a look at these inspiration pics:


You feeling me now? Totally the bomb, right?
I tried this project twice using different materials: once using canvas {dropcloth} and the second time using some weird vinyl leather/pleathery stuff I picked up at Joanne Fabrics. You can refer to my pictures to decide which version you like better.
The only thing wrong with these rugs is their hefty price tag. Real cowhide rugs can run a couple hundred dollars...at least. Someday I will own a real life cowhide rug, but unless I win the lottery or unearth a buried treasure within the next couple of days, that dream will have to wait. So, I did the next best thing, I came up with a cheap and easy way to get the look without the pricetag.
Don't worry, no heifers were harmed in the process.
I tried this project twice using different materials: once using canvas {dropcloth} and the second time using some weird vinyl leather/pleathery stuff I picked up at Joanne Fabrics. You can refer to my pictures to decide which version you like better.
To make the canvas version, you will need the following:
- gesso canvas primer{available at most craft/art supply stores}
- a roller or paint brush
- canvas{large enought for the size of rug you want}
- paint{I used a combo of light and dark brown}
To make the vinyl version, all you will need is:
- vinyl{large enough for the size of rug you want}
- paint{again a combo of light and dark brown}
The first step for both versions is to trace/freehand a pattern somewhat resembling a cow hide onto your material of choice{I traced it onto the backside of the vinyl}.

Next, cut out your hide.

Step three is to prep the canvas for the paint, by applying a generous layer of gesso. For my 4 foot by 4 foot rug, I used almost an entire 16 ounce container. Obviously, for a bigger rug you would need to plan on using more. {Note, there is no prepping necessary for the vinyl version, so you would skip this step and move on to step four.} Allow the canvas to dry. Here's what my canvas looked like after I prepped it. It turns the canvas from a natural off-white, to a true white and it makes it stiff.


Next, cut out your hide.

Step three is to prep the canvas for the paint, by applying a generous layer of gesso. For my 4 foot by 4 foot rug, I used almost an entire 16 ounce container. Obviously, for a bigger rug you would need to plan on using more. {Note, there is no prepping necessary for the vinyl version, so you would skip this step and move on to step four.} Allow the canvas to dry. Here's what my canvas looked like after I prepped it. It turns the canvas from a natural off-white, to a true white and it makes it stiff.

Step four is to paint on the spots. I referred to a photo of a cowhide I liked online and followed the pattern as closely as I could. I figured if I copied the real deal it might look more authentic. I learned that you could get a more realistic, "hair" affect by painting on the spots with one brush, and then gently feather the edges with another, stiff bristled brush.


This is the canvas version. If I may be honest, I like the way this one turned out a little better than the vinyl version. I just think it looks a little more realistic. But, the vinyl version is a much quicker and simpler process because there is no prepping involved. My only complaint about this rug is that I didn't make it big enough. I made mine 4ft x 4ft. If you're gonna take the time to make one, I would recommend you make one at least 6x6. Just sayin'.

{this room is currently "under construction" so just judge my mismatched mess}

{this room is currently "under construction" so just judge my mismatched mess}
The vinyl version turned out great too, but I am concerned about how well it will hold up. So far, it seems to be holding up okay. But I guess only time will tell.
Here's how it all breaks down:
gesso...$10
canvas drop cloth...$10
vinyl...free{leftover from a prior project}
your boost in popularity because you are so flippin' awesome...priceless


No comments:
Post a Comment
I love it when people leave comments, but please keep your spam to yourself. Spam scares me.